I’ve seen many questions about typing and typewriter-like effects pop over the years. While some workable solutions have been posted, they often lack flexibility or rely on outside software. I’ve been sharpening my skills in scripting in Storyline lately and thought this could be a good project.
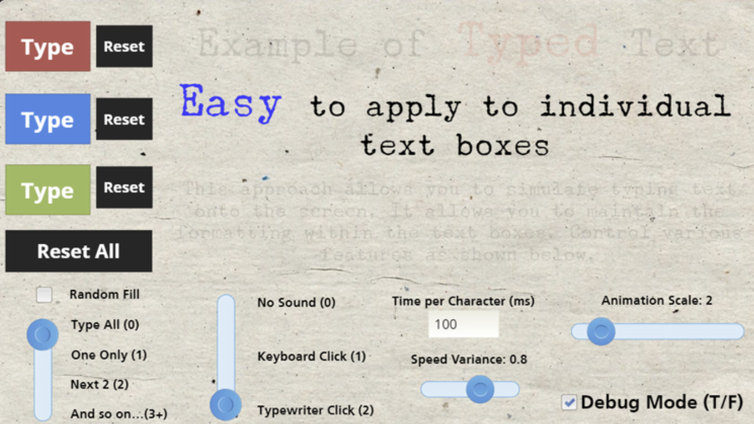
I’ve created an (updated) example project that demonstrates an easy-to-use typing simulation. It also offers a few options for customization. One valuable feature is that it allows you to maintain most of the formatting in your text box (e.g., fonts, sizes, styles, colors, etc.) It also offers optional sound and animation effects. These should work on both Chrome and Firefox. Firefox still exhibits a few quirks, however.
Once the JavaScript is put into place (one main routine and one small piece to set up a few variables), and a few SL variables are created, then you can just set a couple of variables to make your textbox type into place. You can have multiple textbox animations on one slide.
For best project use, the main JavaScript and its trigger should probably go on the Master slide base layer. The smaller settings script goes on each slide that will use the effect.
This has a few potential uses, so feel free to try it out in your projects. I have attached the .story file.
P.S. – There is a free typewriter font you can install first for the best visual effect.
The sounds are included as Base64 strings ,and could easily changed out to suit your needs.
Additional Comments
The key points to consider when trying to use this are:
Make sure you have all of the Storyline variables set up to match these, with the initial values as required
The initialization script (first JavaScript Trigger in the list) has a textKeyList variable that lists the text keys for each textbox you will be using on the slide. This is for the first initialization, which is done using an empty textKey variable. If you only use one one textbox, make sure to edit this list to match the single text entry. Also, make sure the accessibility tag asigned by Storyline matches the text you entered, or at least the textKey value you are using.
textKey only has to be long enough to uniquely identify each textbox by its content
Make sure you don’t assign a default value to the textKey variable (in the Storyline variable list). It need to be blank when first being initialized.
To change the way things are typed, modify the variables (as listed in the initialization script (step 2)) before you toggle typeTextNow
Make sure to set textKey to the value appropriate for your target textbox before toggling typeTextNow
To reset a textbox, set initializeText to true before toggling typeTextNow
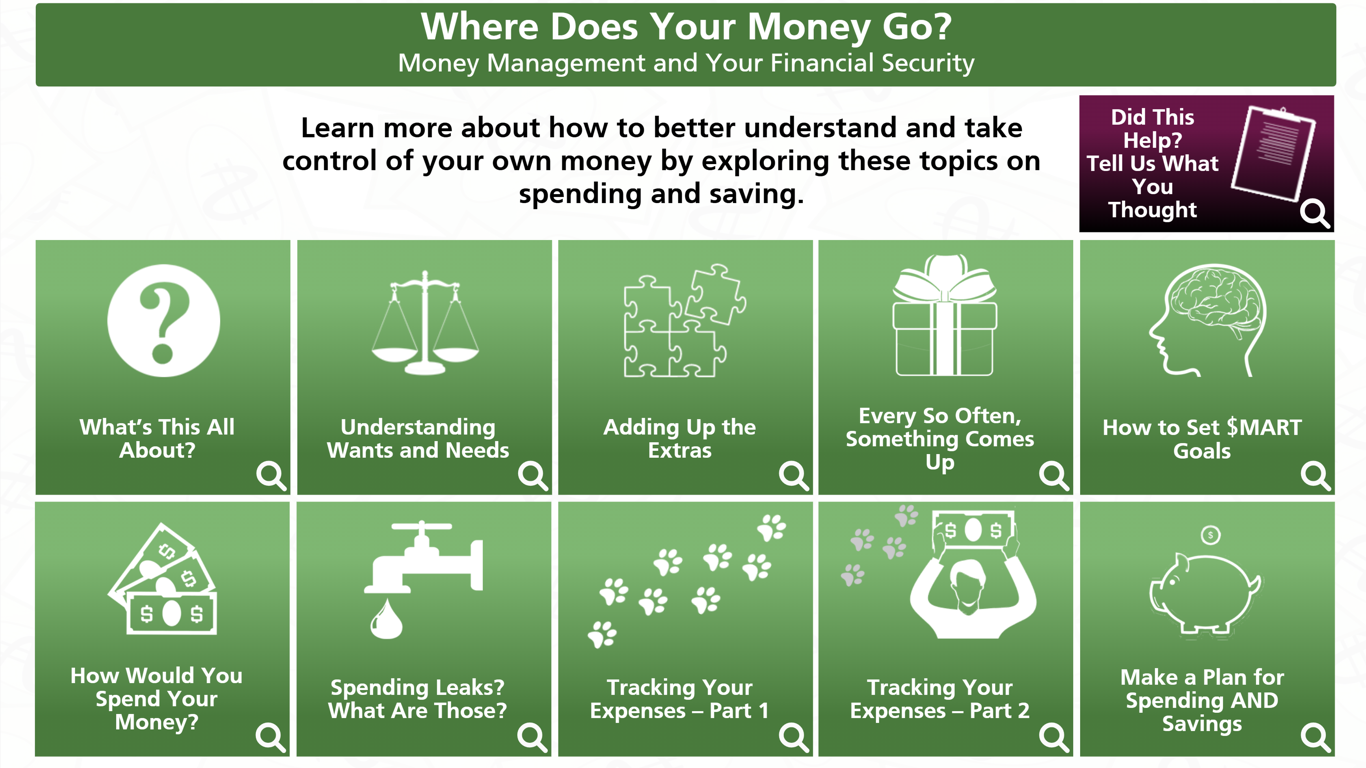
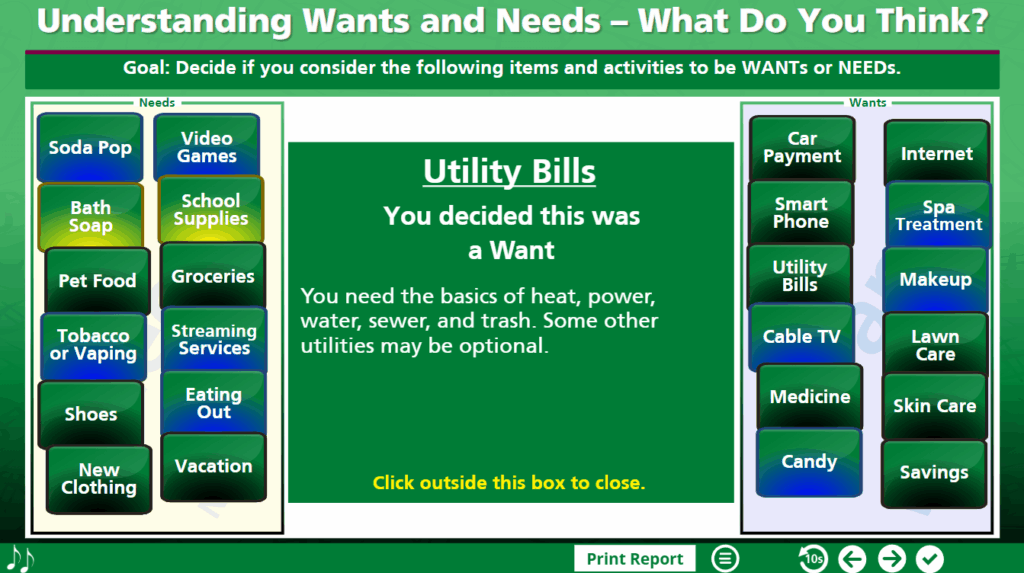
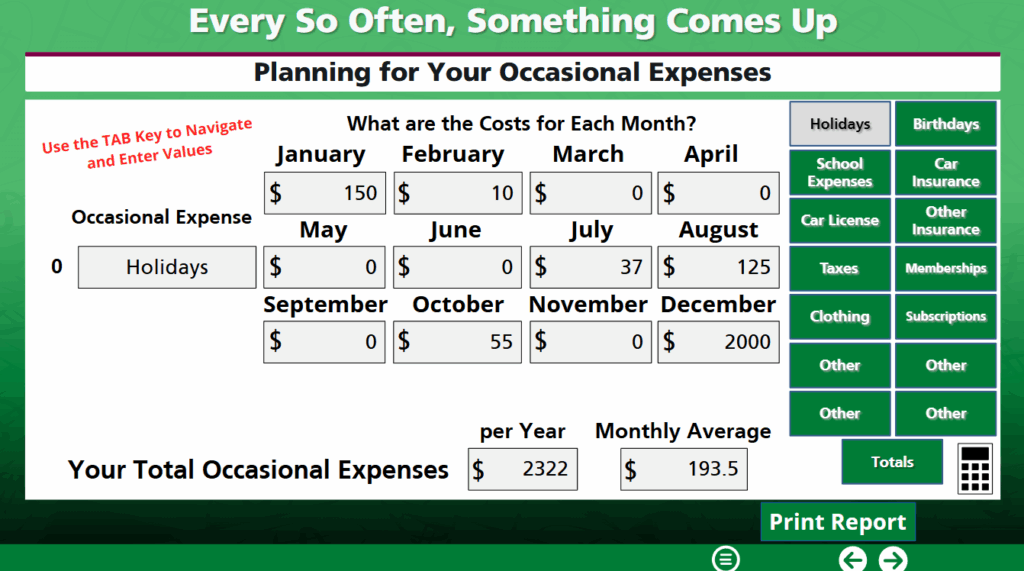
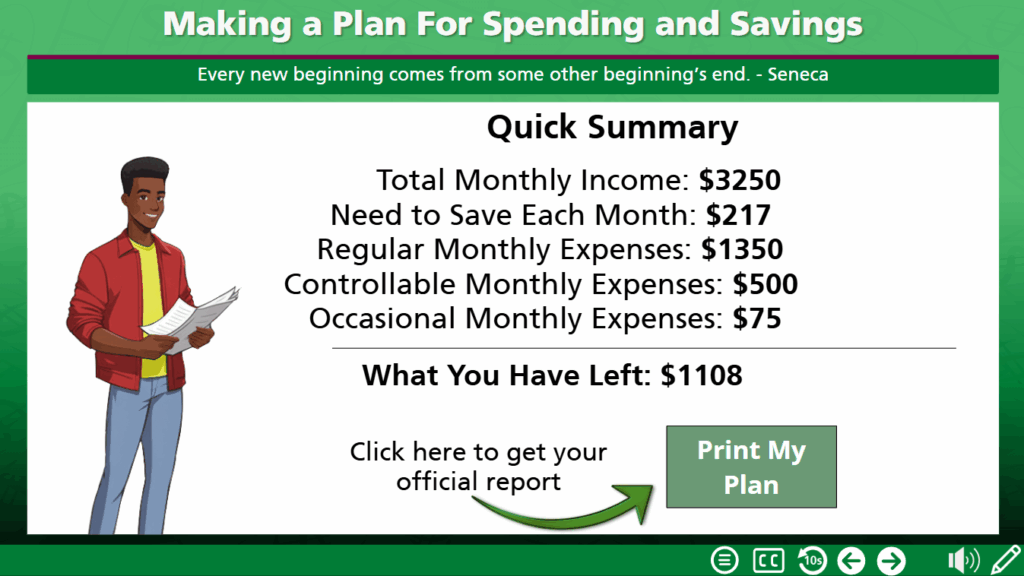
Where Does Your Money Go? is a financial capability program designed to help consumers better understand how they spend their money, including having participants discover their “spending leaks”, identify their financial priorities, and then make a spending plan tailored to their financial needs and designed to achieve their personal goals..
Responsibilities: Instructional Design, eLearning Development, Supplemental Content Development, Multimedia Design and Development using a combination of traditional and generative AI techniques, JavaScript coding
Target Audience: Generally adults and older teens
Tools Used: Articulate Storyline, Krita, Reallusion Cartoon Animator, Generative AI
Budget: Low
Client: Purdue University Extension – Health and Human Sciences
Year: 2023
Overview
The client’s goal was to replace the existing online version of this program, one with demonstrated poor engagement and completion follow through, with an updated version that better engages their target audience and provides a similar experience to that received during attendance of the in-person two day workshop.
64% (166 million adults) of the U.S. population say they are living paycheck to paycheck, and according to January 2022 poll from Bankrate, 56% of respondents say they can’t cover a $1000 emergency expense with savings. Individuals aren’t learning personal finance in school and lack the basic skills necessary to move forward with improved financial decision making.
This project will represent an online asynchronous version of the program and is a basic personal finance approach that can help these individuals learn how to save. This digital offering will help them learn at their own pace, and most importantly make participation viable for individuals who are otherwise unable to attend any in-person workshops due to time, work, family, or travel constraints.
Project Origins
The client mentioned that while an online version of this program existed already, a large driver for the new project was the poor reception this program received. and the very low levels of completion recorded.
Design Approach
{Optional summary of the justifications for the basis of the design. May include problems identified, theories used, project specific definitions, and sample integrated content – a few lines to several paragraphs}
Process
Review of the existing online program revealed a combination of linear design, difficult navigation, and direct transfer of learning materials from the in-person workshops. SInce in-person and virtual (especially asynchronous) education are not generally interchangeable, the issues the program experienced are understandable. Coupling this with the loss of learning autonomy the design implemented only exacerbated the problems.
Instructional Design
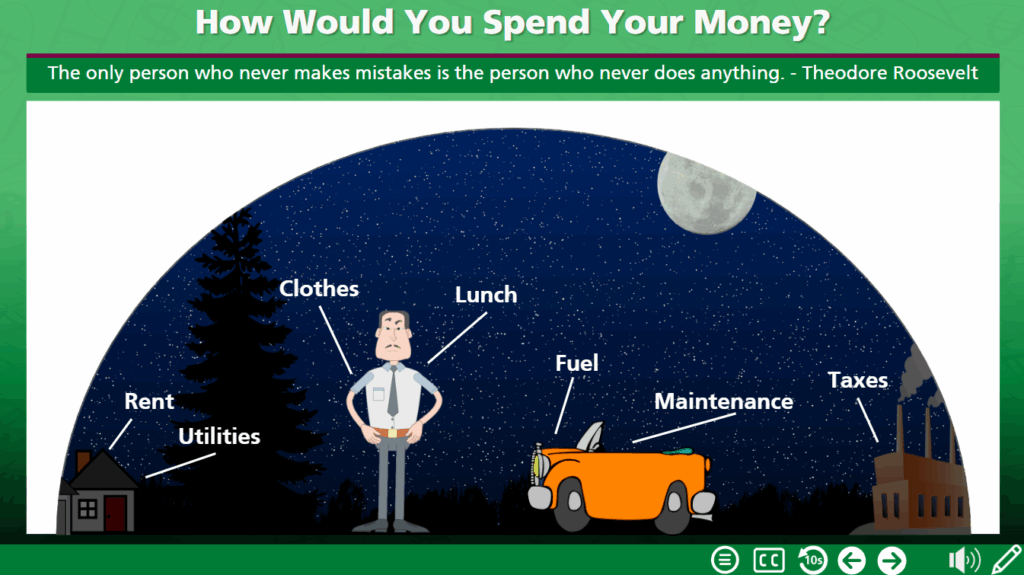
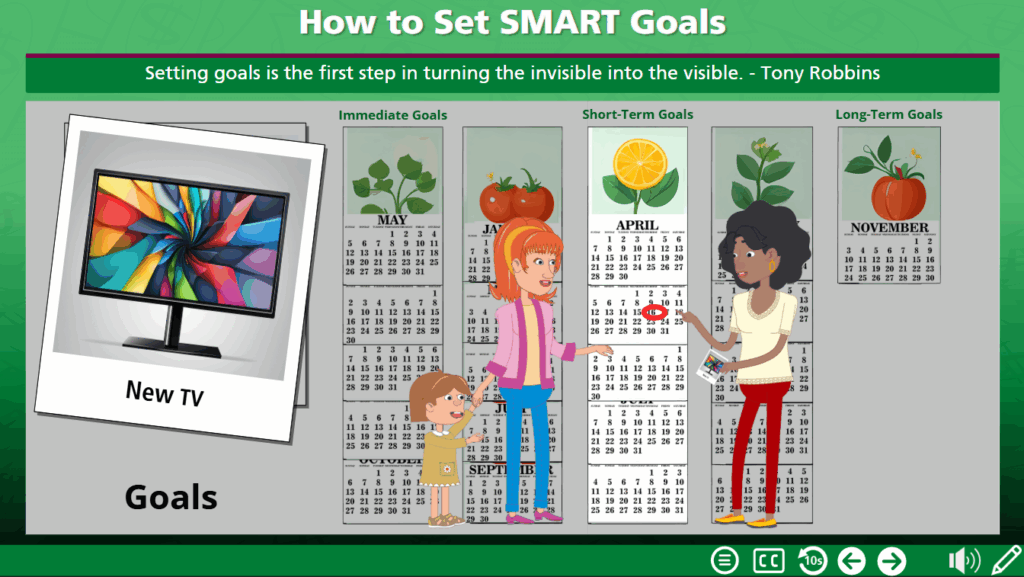
The design for the new modules incorporated basic andragogical principles, allowing adult learners more freedom over their decisions, making the topics directly relevant to their own experiences and personal needs, respecting the learners’ time by minimizing excessive text and unnecessary reading, and including a diverse array of relatable characters to help boost engagement. Interactive elements were incorporated to enhance the sense that the information was made relevant to the individual learner.
Text-Based Storyboard
The storyboard for this project was represented by the general text narrative I developed to encompass the curricular content and weave relatable scenarios to scaffold learning into a familiar context.
Prototype
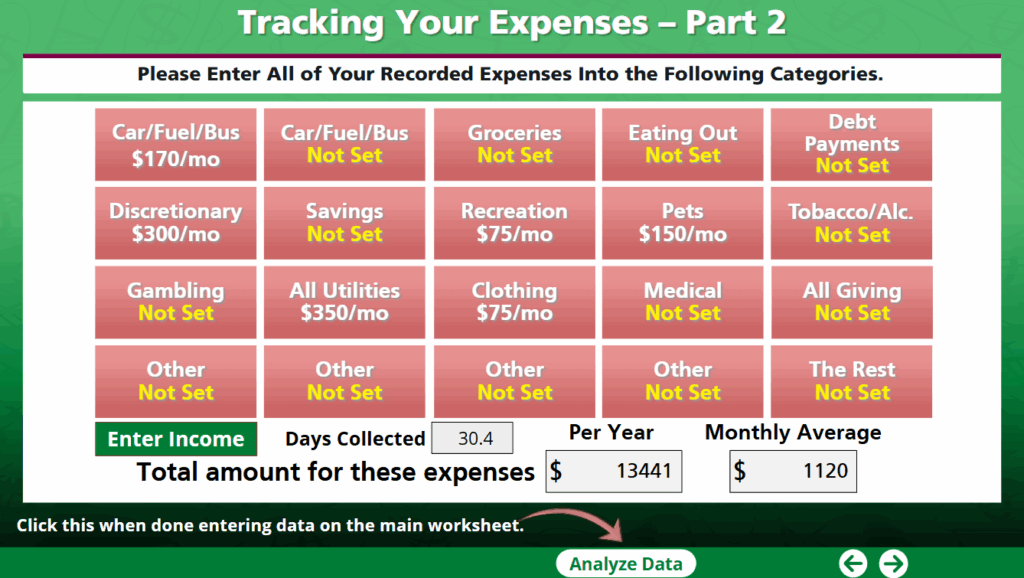
Since a large component of this project centers on financial calculations, much of the prototyping focused on finding a balance between friendly user interfaces and functional data entry within the software platform. Storyline is not very well suited for robust data entry and management, but with some custom JavaScripting it can be made manageable using built-in UI elements.
Final Product
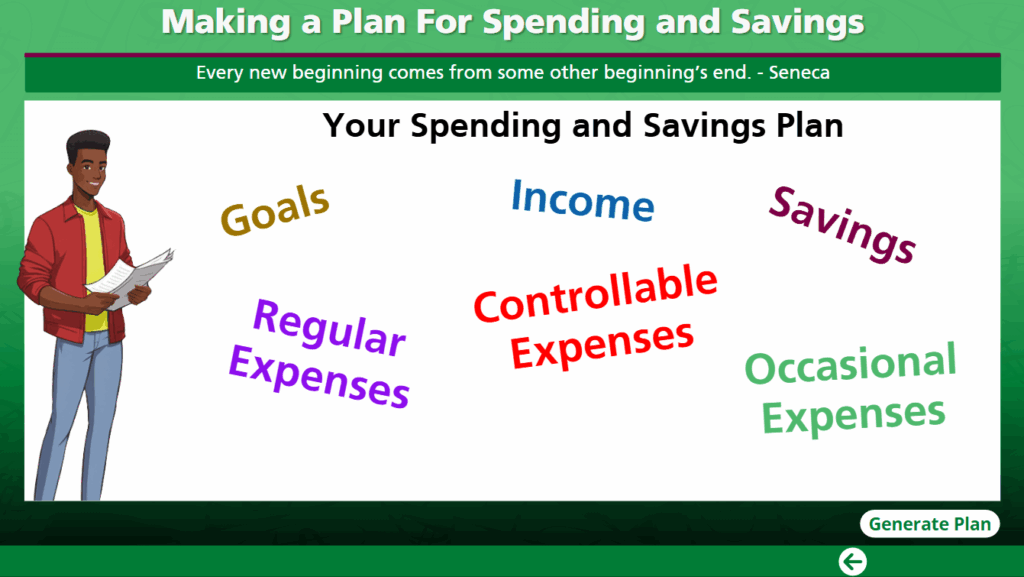
The final product was delivered as a set of microlearning modules, largely with open selection of what order topics could be selected. This freedom helps learners address there most pertinent needs first, establishing the relevance of the learning experience, and helped to maintain engagement through the later modules when additional less interesting topics may be covered.
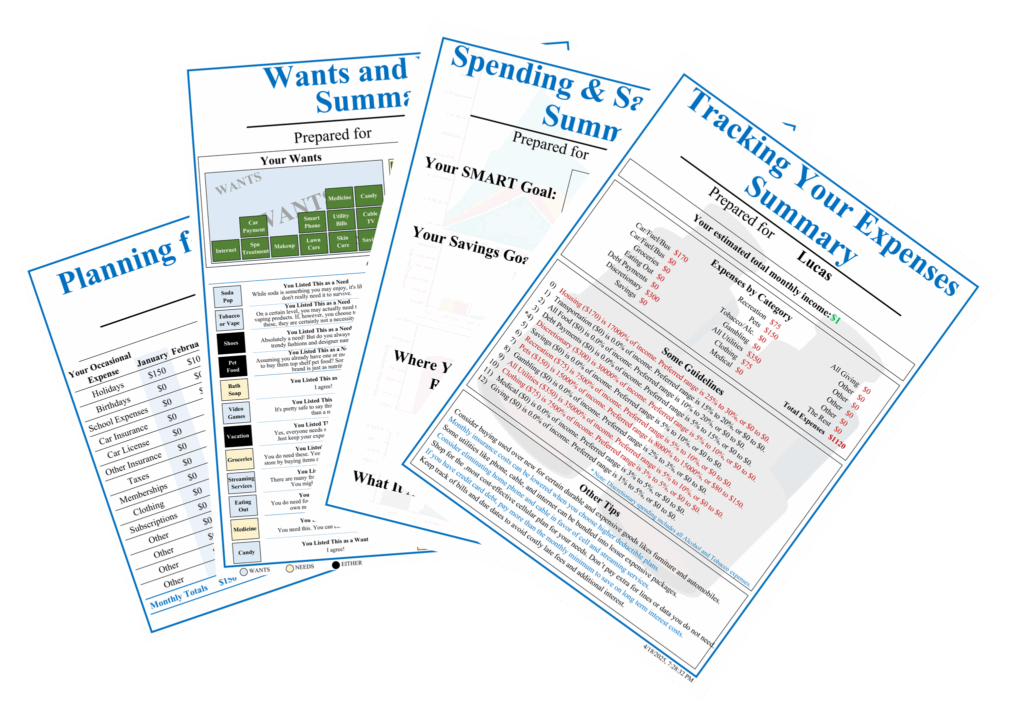
A combination of narrative led education, punctuated by relevant media elements and interactive worksheets helped to simulate the experience that learners would have received had they attended an in-person workshop. FInally, a collection of professionally formatted reports (courtesy of some additional custom coding) provides a deliverable reward to learners, and provides them a tangible goal to acquire at the end of several of the submodules.
Client Testimonial
{Optional paragraph summarizing client feedback or comments on final product}
Results and Takeaways
This project was implemented on an open access Moodle site, allowing maximum reach to a wide, multi-State audience.
Providing learners with even a modicum to financial literacy tools can vastly improve their financial outlook, and greatly increase the likelihood of setting and achieving personal goals.
This project began early in my JavaScripting journey. Much of what was developed could benefit from refactoring or entirely reworking the logic behind the worksheet calculations. There are other, more elegant spreadsheet solutions available, but the tradeoff with this is increased difficulty with their integration with Storyline. Given more time, or an opportunity to update and over haul this project, this may be a more viable course to take.
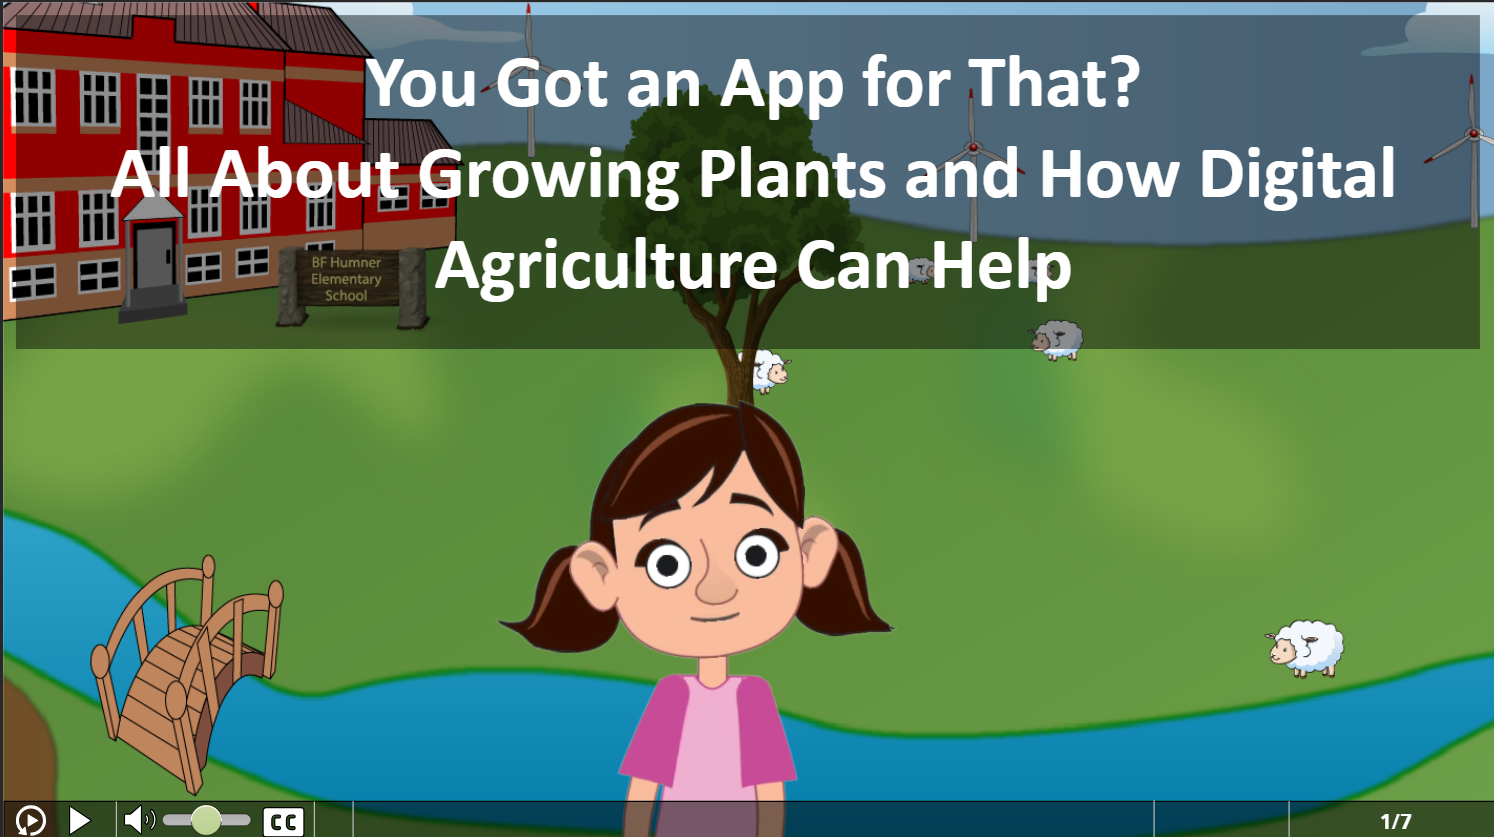
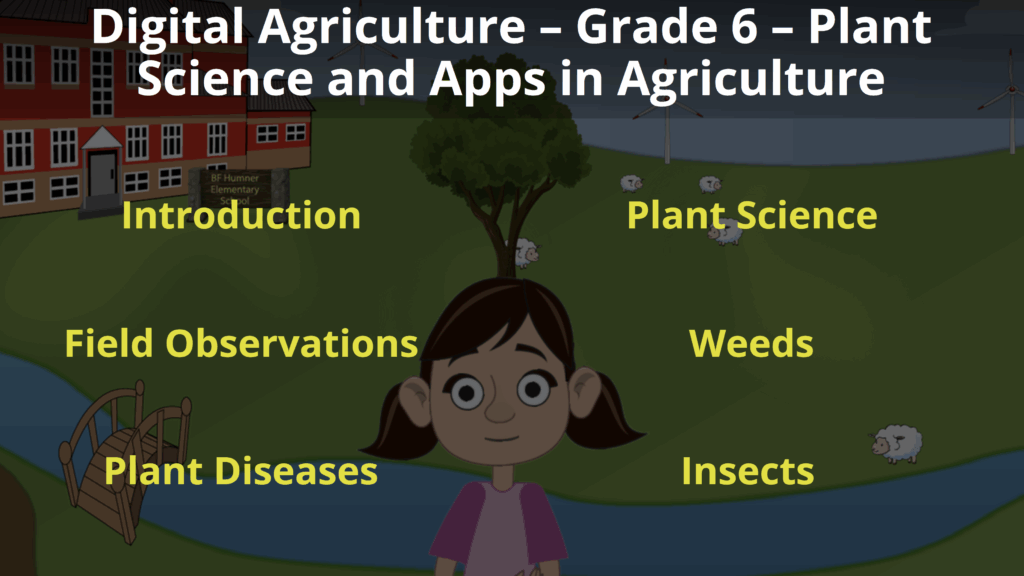
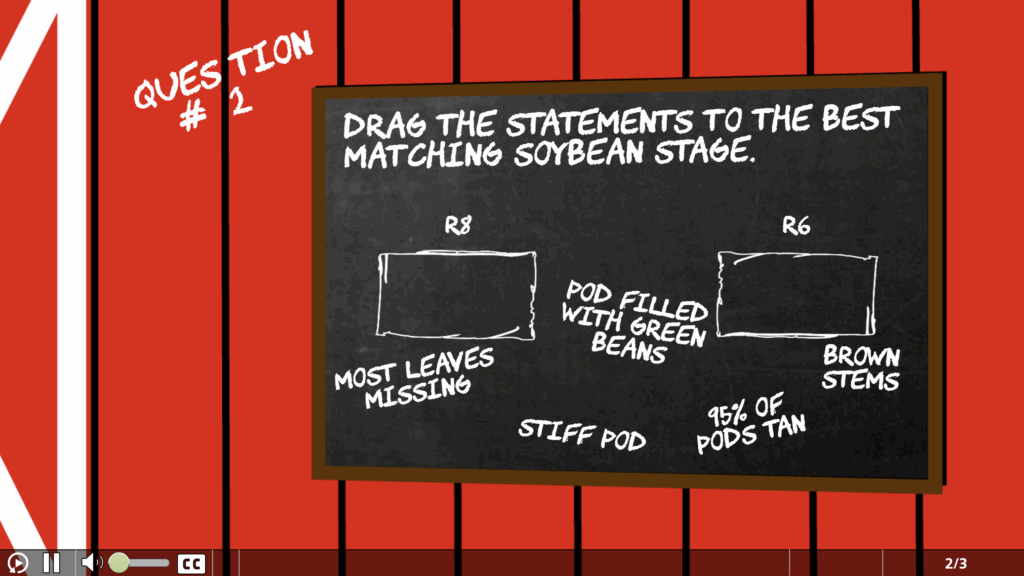
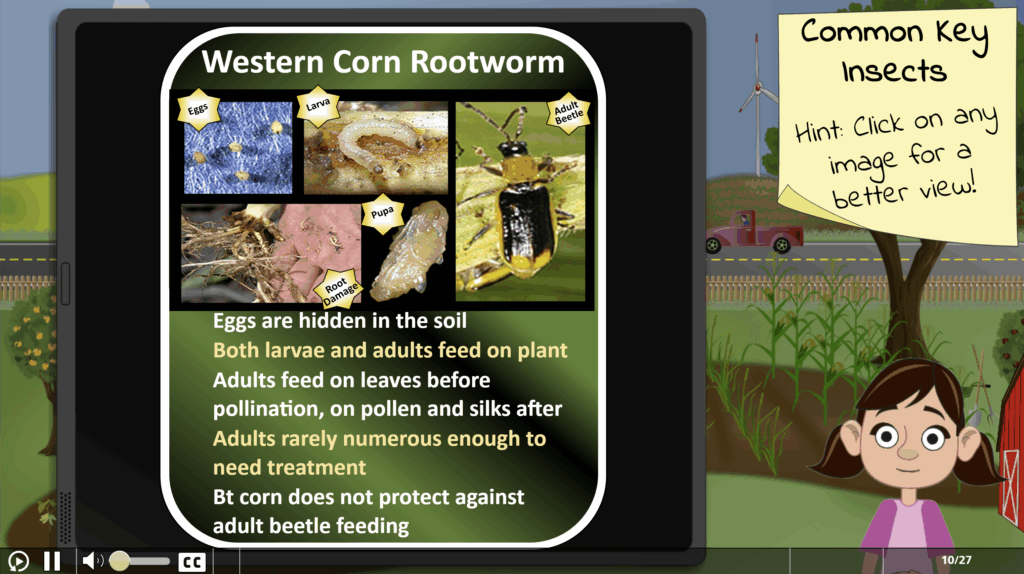
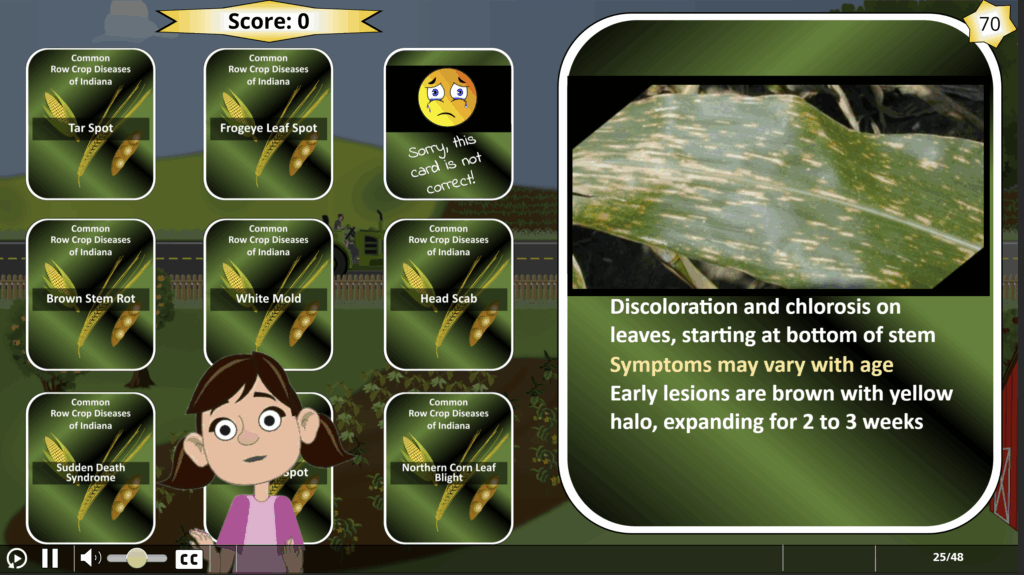
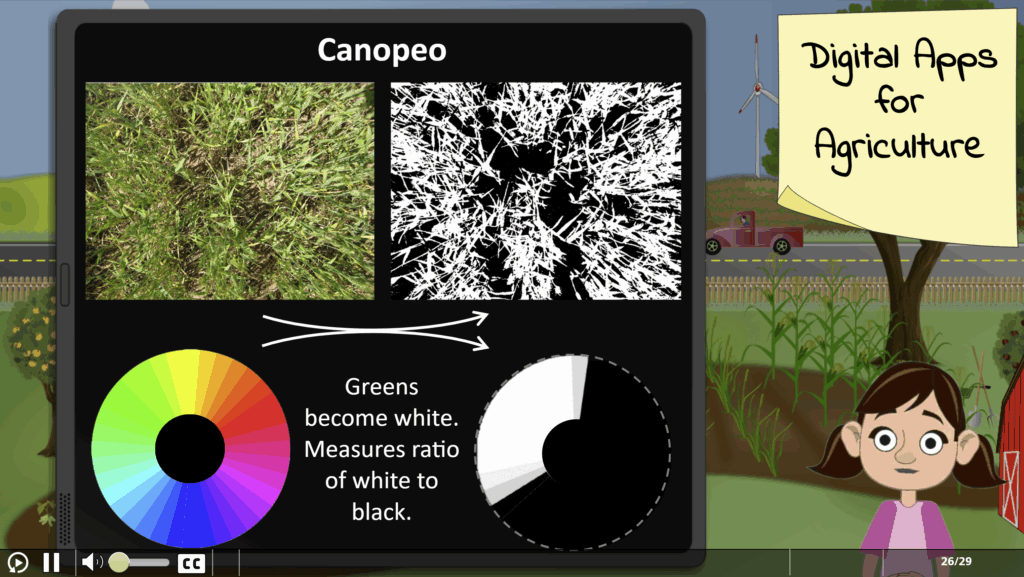
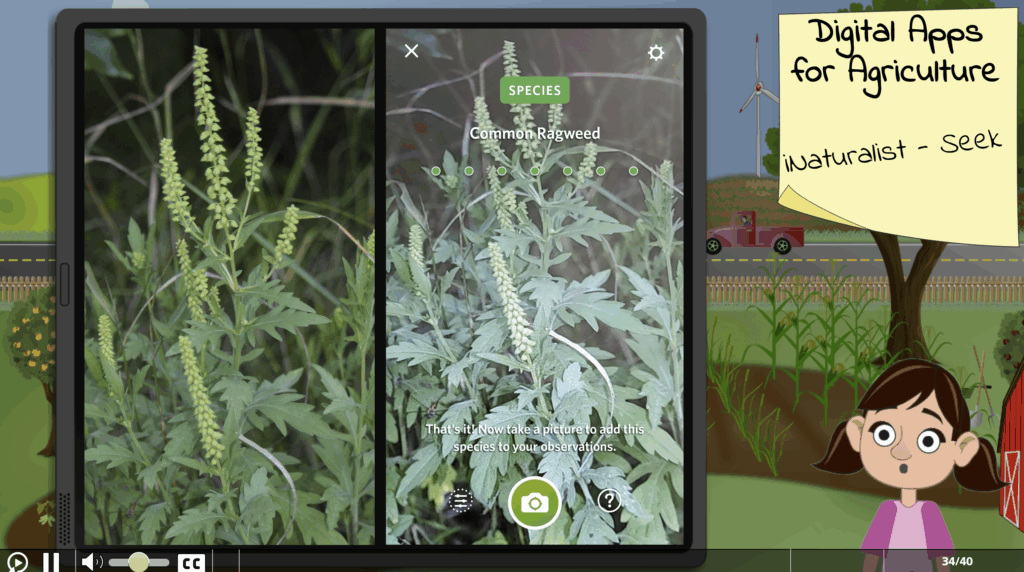
This was a project targeting 6th grade 4-H youth interested in learning about the role of digital (i.e., smartphone) apps in agriculture. It is part of an overall larger Digital Agriculture project. This module is quite extensive, and introduces a number of topics related to plant science in agriculture.
Overall, the Digital Agriculture project seeks to introduce youth to the role that digital technology plays in agriculture and agricultural process. Topical targets vary from year to year, allowing learners to acquire an extensive breadth of knowledge during their time participating in 4-H.
As of 2022, the U.S. suffers from a general lack of understanding related to science and agriculture, and how these are vital to solving global problems. As society and its need for digitally trained workers progresses, youth will require a fun and engaging way to prepare their future careers.
The solution needed to create broad appeal and engagement across social, cultural, economic, and gender boundaries, targeting a wide distribution of grade and experience levels.
The client Agreed with the overall approach proposed for this project and felt the design concept was well suited to their youth audience.
Project Origins
{Optional summary of how the project came to be and what influenced design decisions or tools}
Design Approach
For this project, I followed a guided immersion approach, utilizing a blend of text, graphics, descriptive narration, and interaction to allow participants to feel as if they are part of, rather than subject to the learning experience.
Process
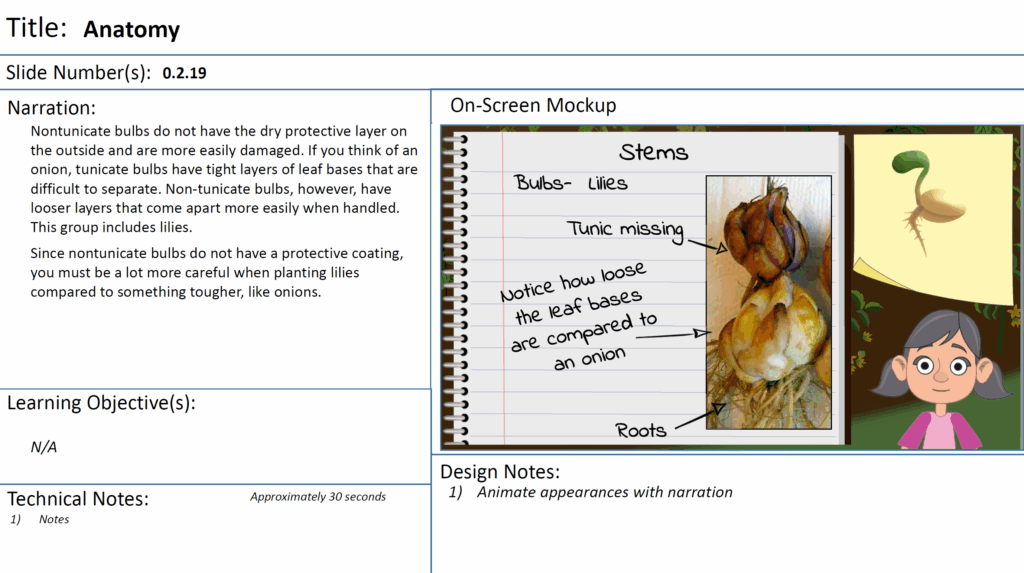
This project started life as a broad but not very detailed 160 slide classroon-notes style PowerPoint presentation. After extensive evaluation of the provided curriculum, topical research, and content enhancement, the final product spanned approximately 400 indiviual learning module slides.
The design centered around one identifiable main character who played the role of mentor to the slightly younger participants. A narrative storyline led learners on a journey through the various topics, making them a part of the experience and enhancing overall engagement. The entire scenario was centrally rooted in the very familiar setting of an elementary school nature garden, with student-led operation of a working vegetable garden. Knowledge was gained through experience and passed on by students, from one generation to the next
Instructional Design
The instructional design process require me to gather and evaluate numerous topical content resources. These typically derived from college and professional level sources. From this supplemental material, new information was extracted and concepts aligned with established learning objectives. All concepts and language was translated to age-appropriate representations for learners. Finally, I developed an engaging narrative, supported through use of customized multimedia and interactive learning activities.
Text-Based Storyboard
Due to the scope of the content and detail related to additional curricular content required, a detailed text and graphic-based storyboard mock up was developed for the client. This allowed everyone to clearly understand what concepts were to be covered, to what detail, how the presentation would be approached, and provided an overall look and feel for the project.
Prototype
The extensive storyboard for this project served as its protoyype. The final development closely aligned with the storyboard content, layout, and design.
Final Product
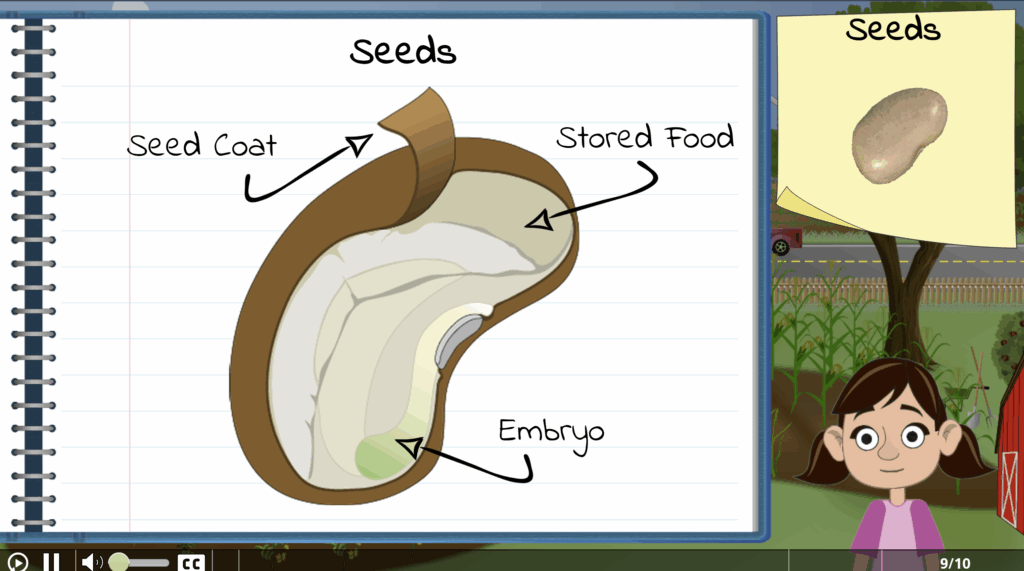
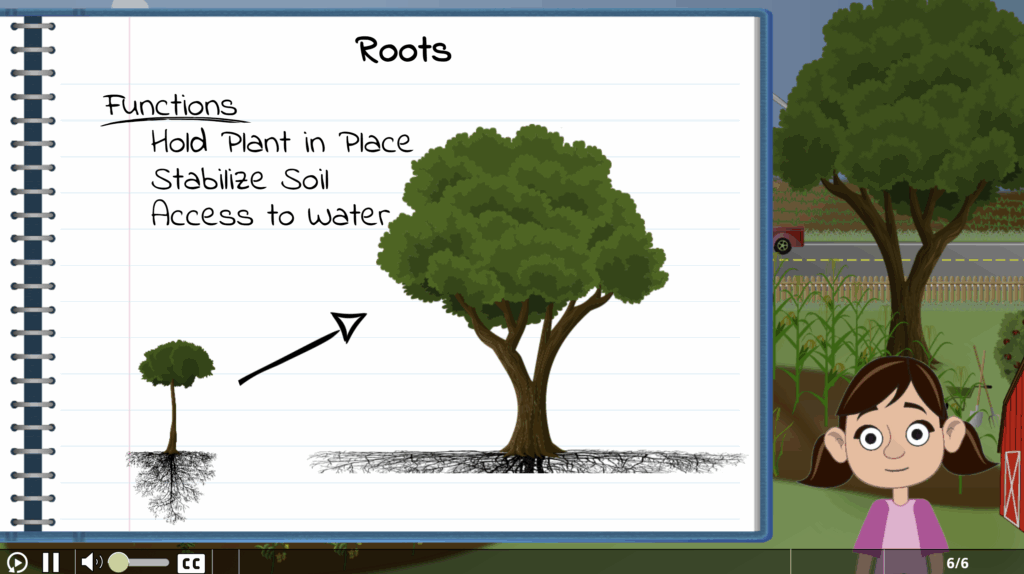
Due to the overall size of this project, the final module was delivered as six standalone submodules, each addressing a single topic. As each topic was developed, it was sent to the clients for final review. The modular design facilitated all of the design and development processes.
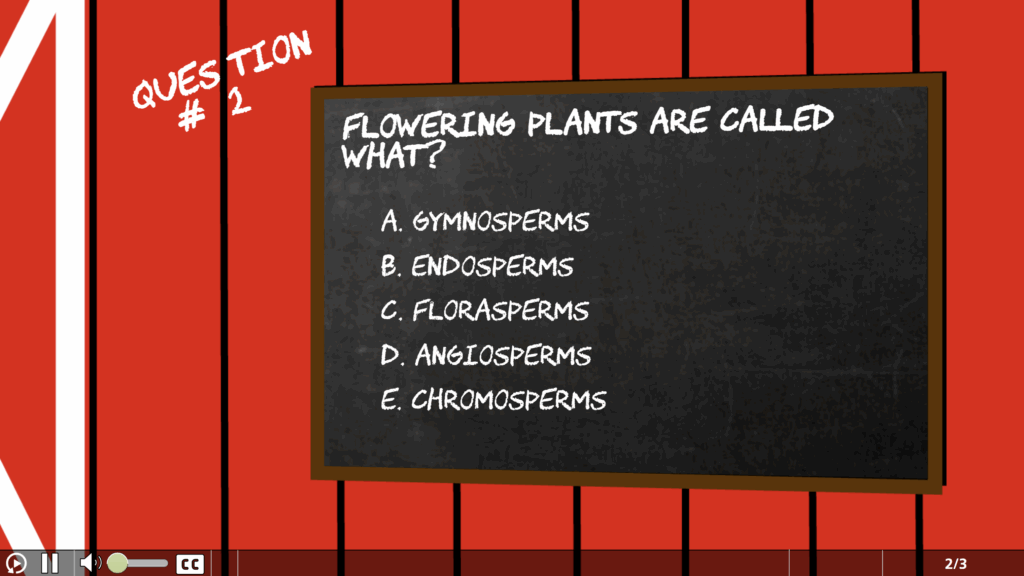
In the end, the project included pre and post tests, formative assessments (i.e., knowledge checks),
interactive gamification elements (e.g., a card drawing identification game), an animated narrator/guide,
and interactive participation with smartphone apps while learning about their uses in digital agriculture.
Client Testimonial
{Optional paragraph summarizing client feedback or comments on final product}
Results and Takeaways
This project was originally intended to be a self-driven 4-H learning experience, although educator later decided it would work better as part of an overall guided experience.
The value of this project is the early introduction of a broad knowledge base for agriculturally related topics to potential student in the science. Agriculture is often overlooked as a scientific discipline, and unless incoming students are aware of the field and its value, it may never become an option for otherwise well qualified and interested learners. Much focus is placed on the science of science, but little expands outward, to the application of science in practical yet equally important fields such as agriculture.
This project strives to push learners to expand their understanding of agriculture and cross the traditional boundaries science course place on scientific knowledge. As such, the topic material and presentation are probably at the upper limit of the targeted age group. The scope of this project makes it most suitable for motivated learners, and may be a bit too intense for others.
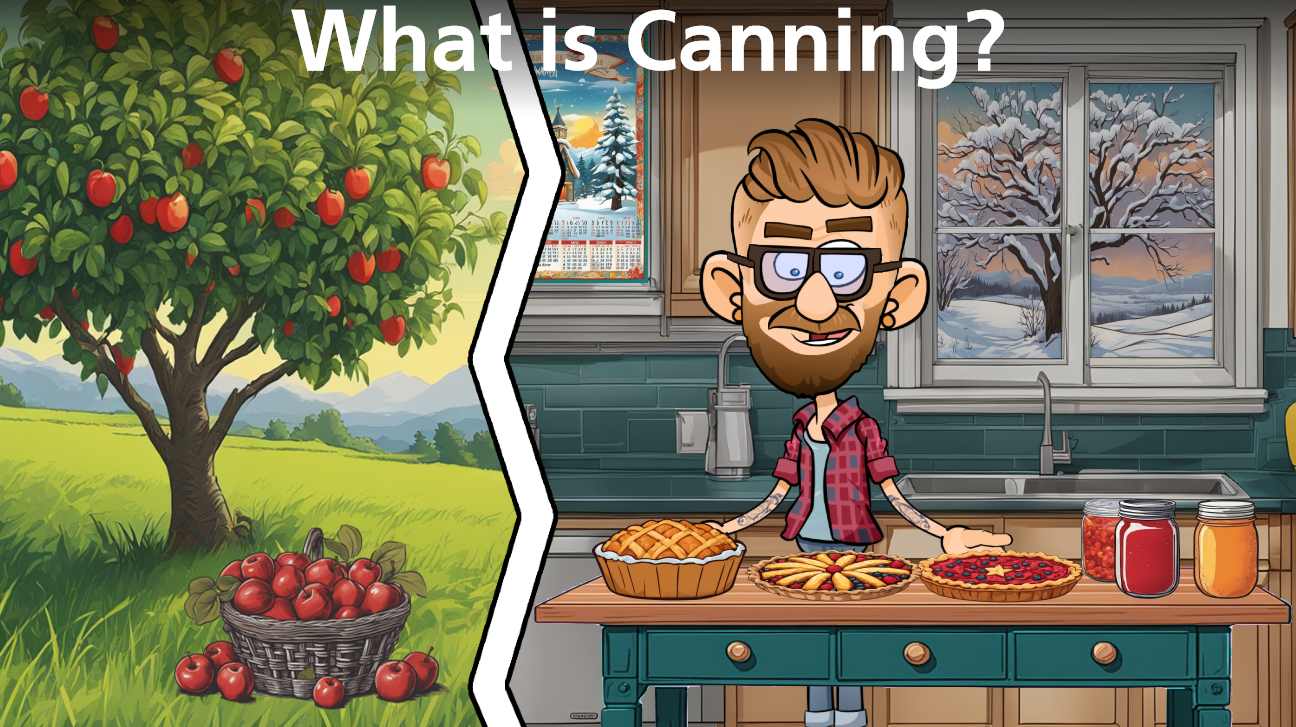
This was a digital approach to extend the reach of home food preservation education to unreached learners not only across the State, but also across the nation.
Responsibilities: Instructional Design, eLearning Development, Supplemental Content Development, Multimedia Design and Development using a combination of traditional and generative AI techniques
Target Audience: All ages, teens through seniors
Tools Used: Articulate Storyline, Krita, Reallusion Cartoon Animator, Generative AI
Budget: Low
Client: Purdue University Extension Services
Year: 2025 (in progress)
Overview
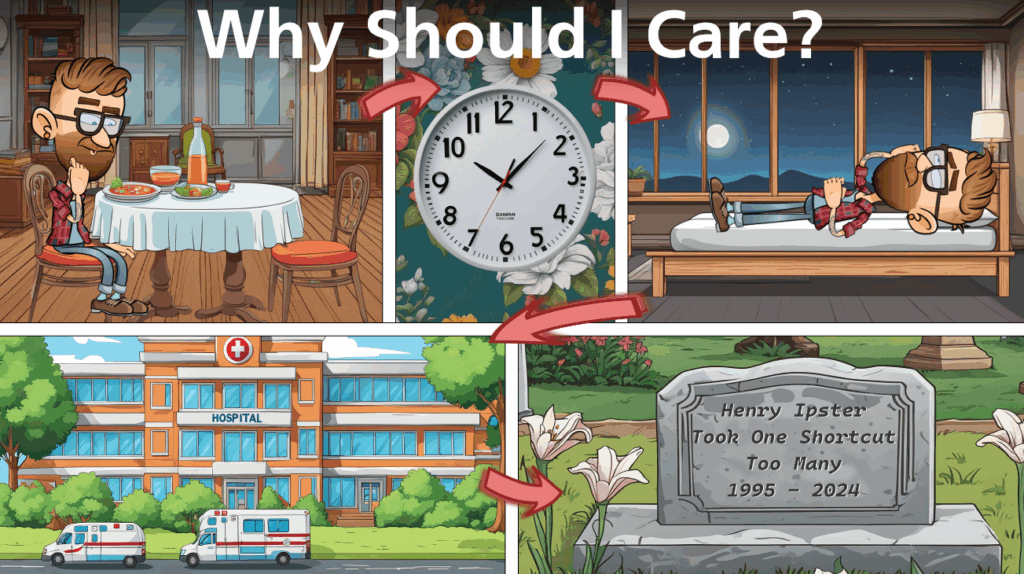
As purveyors of research-based knowledge, one responsibility of Purdue Extension is to exhibit a digital presence amongst internet information sources, reducing the misunderstandings and misuse of inappropriate food preservation methods while supplying access to approved and tested approaches to safe home canning.
A digital offering of this sort provides easy access to reputable knowledge, reducing or eliminating reliance on and influence by less qualified and questionable internet sources.
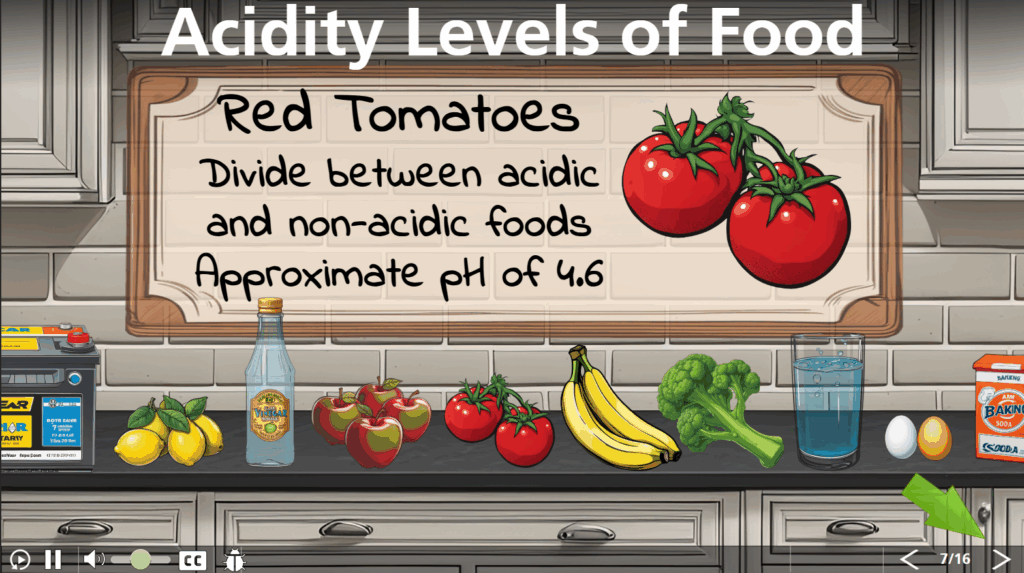
This project serves a wide audience, spanning from teens learning about food preservation methods to older adults who regularly engage in home canning and preservation practices as a daily part of their overall nutritional and financial practices. In keeping with other extension projects striving to reach a wide audience with varied educational and experiential backgrounds, this module utilizes a low text, high graphic format that helps to engage learners in potentially technical topics by immersing them into familiar environments with relatable characters guiding the way.
The client agreed with my approach, feeling the learners for this topic would be better served by limiting the cognitive load and maximizing the engaging atmosphere of a potentially dry and procedurally heavy topic.
Project Origins
{Optional summary of how the project came to be and what influenced design decisions or tools}
Design Approach
{Optional summary of the justifications for the basis of the design. May include problems identified, theories used, project specific definitions, and sample integrated content – a few lines to several paragraphs}
Process
This project targeted a broad audience and addressed a very specific and hands-on topic. Extension workshops are typically in-person and demonstration oriented, using materials and supplies relevant to the discussion. As a result, translating such content to asynchronous digital environments requires significantly more than the mere transcription of scripts and objective lists.
Instructional Design
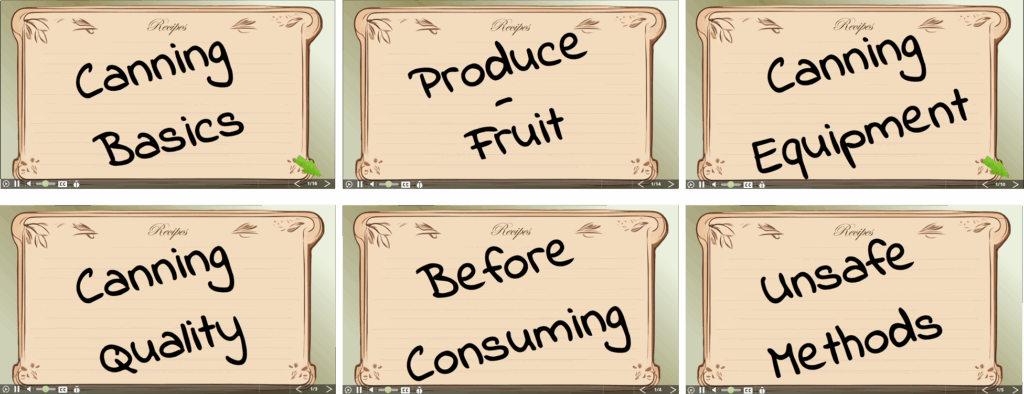
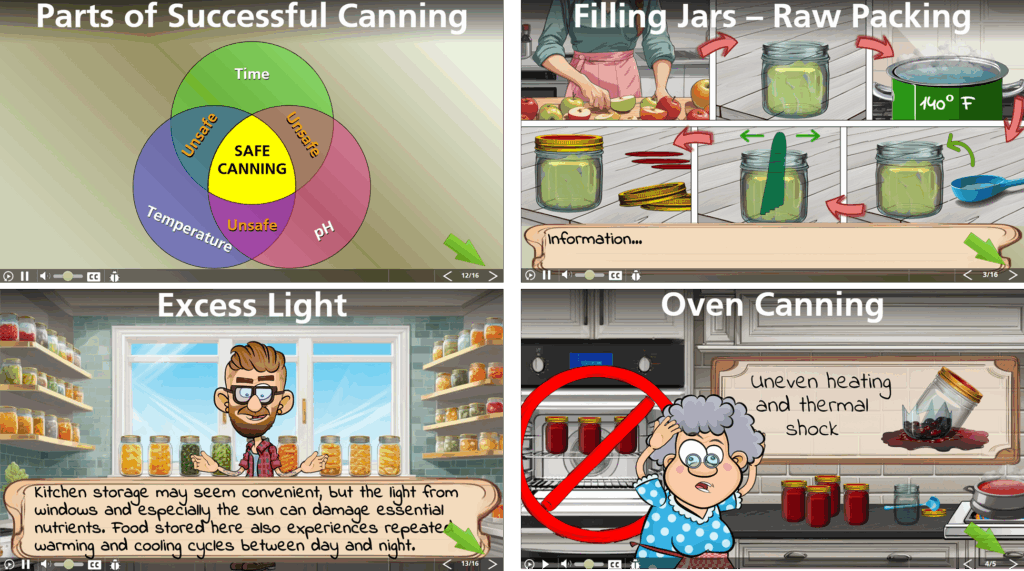
This module was part of a larger overall food preservation project. For the Boiling Water Bath Canning component, I worked with the client’s contnet materials, identifying key themes and topics suitable for online representation and content coverage.
With client approval, each of these topic areas served as the theme for submodules. Special consideration was given to how each topic area could be represented to learners in a relatable and engageming manner, despite the asynchronous nature of the learnnig.
Text-Based Storyboard
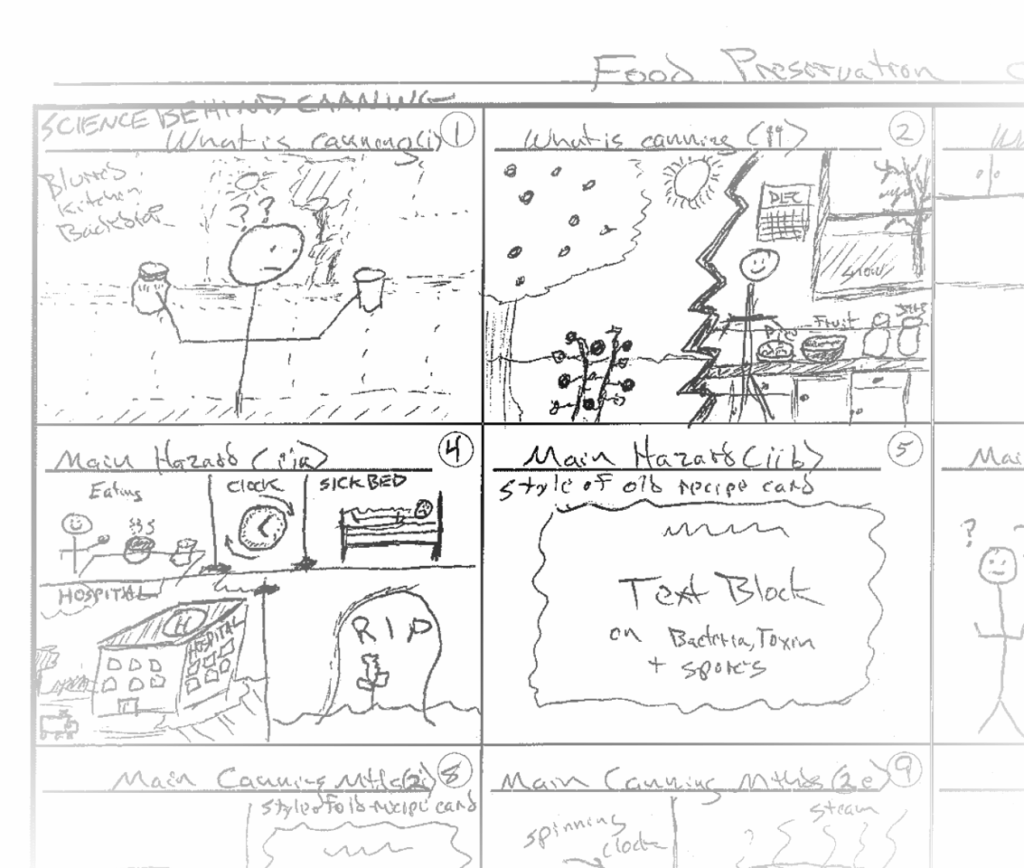
Due to the specialized technical nature of the curricular content, I decided to develop a visual storyboard , based on the client’s content documents, to represent the submodule topics. Normally, I would develop and work from a text narrative, but in this case I needed to ensure that the required content could be adequately visualized by learners. The storyboard was still curricularly driven, but the viability of accurate and consistent visuals guided the way here.
Prototype
After client approval of the media prototype, work will progress to narrative scripting to support topical content, fleshing out module slides with appropriate textual scaffolding, addition of interactives, and assessments.
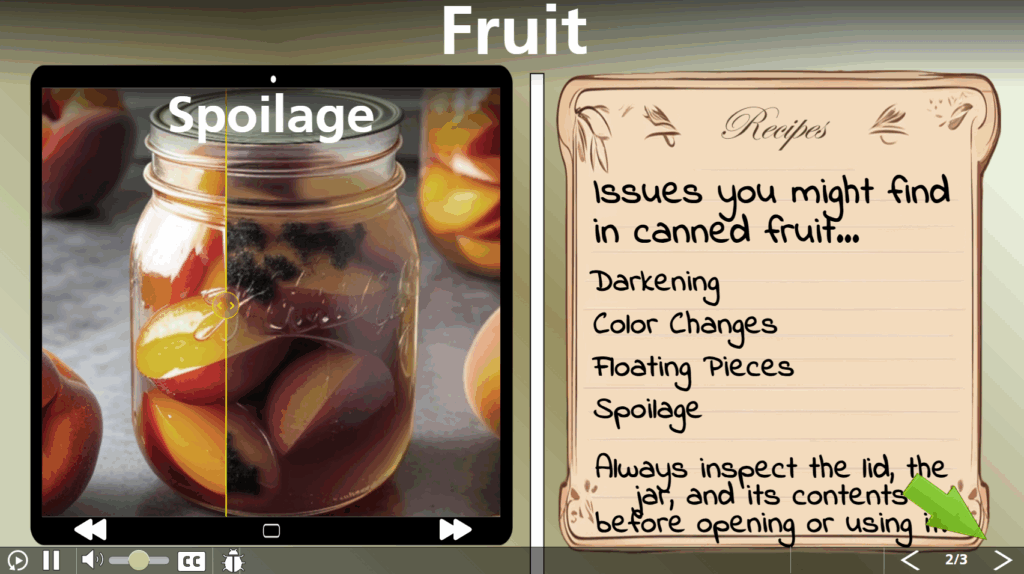
Some custom JavaScript provided additional interactive functionality, such as active image coparisons between process success and failure states. Additional interactives are under development.
Final Product
As a final product, this module will include additional interactive elements, formative and summative assesments, as well as some form of process simulation (currently under development).
Client Testimonial
{Optional paragraph summarizing client feedback or comments on final product}
Results and Takeaways
{One line describing implementation of the project}
{Perceived value and expected outcomes – 1 to 2 lines}
{Takeaway and impact on future work – 1 to 2 lines}
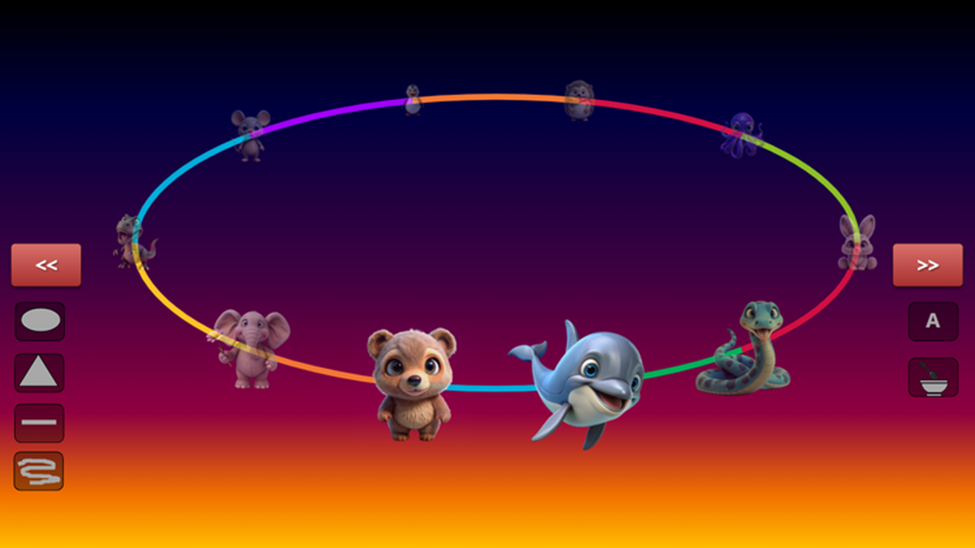
Inspired by a recent post about replicating an animated carousel menu in Storyline, I came up with this solution. As it is pretty easy to implement and quite flexible, I thought I would share the results with anyone who wants to use or modify it.
The original can be seen here. While this can be replicated in Storyline with animation paths and some creative layering, it seems this would quickly become difficult to manage. The approach I settled on, once you add a bit of JavaScript on the Slide Master and a few SL variables, only requires you to add some menu items and a shape path to your slide.
The menu items could be a variety of things like images, shapes, text, videos or something similar. These get labeled as menu items in the accessibility tag.
The shape path can be a closed shape, like a circle or square, or open like a curve or scribble. These ae labeled as paths.
After specifying the starting characteristics for your menu layout, a simple variable change will move your menu. It will automatically resize with your slides. Very easy.
For those who just want the files, you can skip the details below. For the rest, I will describe how it works in case you want to make any changes for your own uses. Aside from menus, I could see this as useful for creating animated indicators, moving pieces along a 3-D gameboard path, or animating informational displays, among other things.
How It Works
My background with GSAP is limited, and mostly comes from reading posts from Math Notermans and the GSAP website. As Math has pointed out, Storyline uses GSAP behind the scenes to handle a lot of its animation behaviors. Since it is included, you can access GSAP directly in your own JavaScripts. You can also include any of the freely available GSAP plugins for extra functionality. Storyline only includes basic GSAP, so I added the MotionPath plugin using a technique described in one of Math’s many posts. This plugin allows you to utilize paths, like those you might find within SVG graphics, to control the motion of other objects.
Each of the Storyline slides uses the Document Object Model (DOM) to define the HTML document, and all the elements it contains. When you add a shape, like the ellipse used in in the included example files, HTML document is modified, adding an SVG graphic and some additional elements that wrap around it to keep things organized. The general layout is:
<div … data-acc-text=”menuPath” …> (this is the wrapper object identified by the Accessibility tag) <div>(this a wrapper for the SVG graphic) <svg>(this is the actual SVG graphic) <g >(this is the stuff that makes up the parts of the SVG) <path>(this is the information that describes the border and fill of the shape) </g> </svg> </div> </div>
The path attributes include “d” for the data and several styling values like “stroke’ for color, and related values for width, opacity, and fill. We are most interested in the path data, or “d”.
The path describes the shape of the ellipse. Since we want to animate our menu items around this shape, we want to use this path data. The easiest way to do this is to follow segments of this path. Dividing the ellipse into four equal segments would allow us to distribute four menu items evenly around the ellipse. This is where the MotionPath plugin comes in handy. It provides functions that can extract path data and cut them into smaller pieces.
To keep track of these new shorter segments, we can use the fact that SVGs can hold multiple paths. If we extract the path data from our original ellipse, cut it into four equal pieces, and then replace the original path element with four new path elements, one with data for each segment, then we will still have what looks like an ellipse, just drawn in four steps instead of one.
GSAP already provides .from , .to, .fromTo, and .set functions making it easy to animate objects on your slide. These usually specify beginning or ending coordinates, or both. The MotionPath plugin adds the ability to specify a specific path to follow instead of just a target coordinate. This is how each of the menu items get moved from position to position.
It is important to keep in mind that GSAP just adjusts elements on the page AFTER the original layout was created. Storyline only knows where things were when they were originally laid out. If GSAP moves them, Storyline will not know. Not surprisingly then, if you resize your slide after using GSAP, anything you have moved will become misaligned. Storyline doesn’t know where you want them to be. You must take responsibility for that. To do so, you need a resize event handler.
A resize event handler will watch your slide, or some part of it, and act when it senses a resize event. It calls a function that you create, and this is where you will provide the details of where anything that you move should be placed. In our case, we keep track of where each menu item is along the path. Since we know where every is supposed to be, when a resize event happens, we can easily have GSAP move everything back to where we want to be using the .set function. This just moves elements to the endpoint of the path you specify.
Usage Details
To use this menu, you will need to do a few things (see the example .story file for details).
Add the main JavaScript routine to the Master slide
Trigger this on variable change (“triggerMenu”)
Add all the new menu-related variables to your Storyline project
Now, on any slide you want to have a menu:
Add a small piece of JavaScript to each slide containing a menu
This just contains some variables you can use to specify how the menu looks, and where items get positioned
Add your menu items to the slide
Set the accessibility tag for each to represent the item order
Label them “menuItem_1”, “menuItem_2”, etc.
Add a shape path to the slide
Set the accessibility tag to “menuPath”
Group all the menu items and the shape path together
Set the accessibility tag for the Group to “menuGroup”
This just makes it easier to move your menu around and allows the script to hide the menu before it is initialized
This also allows you to not worry about where the menu items are placed. Just place the shape path where you want it and put the menu items anywhere on the slide. They will be moved into position automatically
Trigger the menu movement and direction by adjusting a couple of variables in Storyline
When changing slides, you must disable the resize event handler before changing slides because the menu items will no longer be available to update. An error will occur.
Before leaving slide, set “menuEndResizer” = true
Toggle “triggerMenu” to remove the resizer
Now you can change slides
Menu Items
For menu items, you can use elements that can be grouped. Don’t use elements with states that can change on hover or click, like a button. This code will not currently handle these state changes, and the items will lose their positions. You could modify the code to accommodate states if you really wanted to. Menu items used in the example file include images, text boxes, shapes, characters, icons, and even videos.
Menu Paths
For menu paths, you can use closed shapes like circles, squares, triangles, etc., and open curves and scribbles. Don’t use a straight-line shape. Use a curve drawn as a straight line instead. Items will jump from the end to the beginning of an open curve.
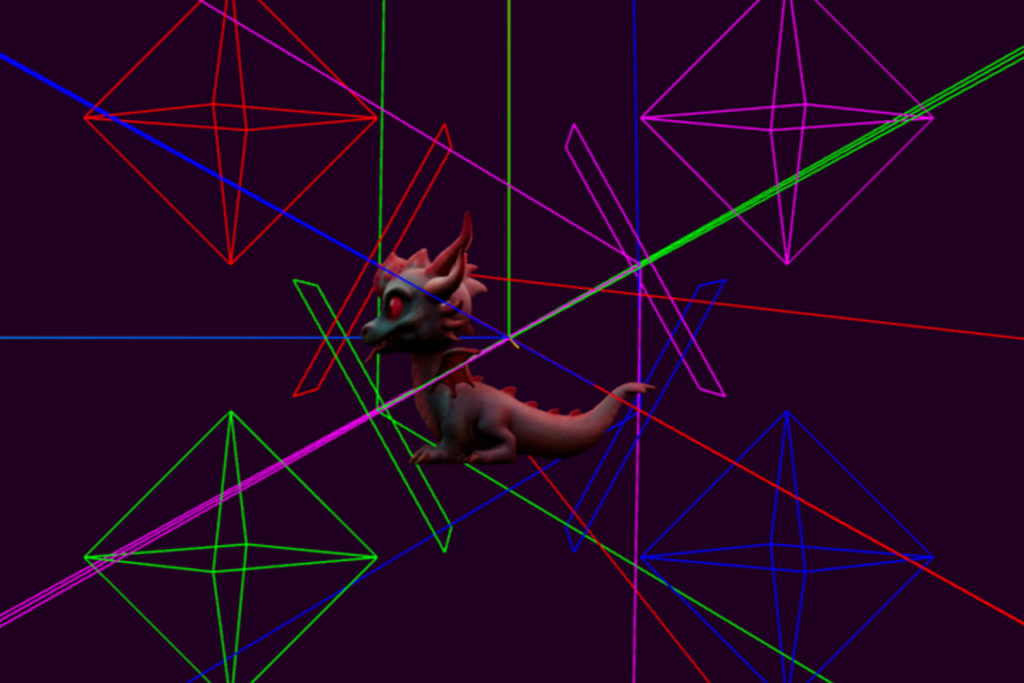
To help with positioning, you can set the ‘menuDebug” SL variable to true to see the individual path segments in different colors.
Based on the settings you specify, the script will indicate which menu item is foremost, in case you want to restrict any triggers you set up on them.
Settings Variables
For each menu you want to use, copy the settings script, and change the values accordingly. These include:
menuItemCount
How many items are in the menu (make sure each has an accessibility label).
scaleFactorTo, opacityFactorTo, zindexFactorTo
Specifies the target styling for each menu item at the END of each path segment. Path segments are indexed starting at 0. The staring point may differ between shapes. Use the debug feature to see the segments. They start with Red, and then proceed through Green, Blue, Orange, Yellow.
itemPathMap
This indicates on which segment each menu item should start. When initialized, each item will be placed at the end of its starting path segment.
pathSegment
if pathSegment[0] = “auto”, then the script will divide the path evenly to match the number of menu items. This works fine for something like an ellipse. If you want to match item positions with vertices or specify specific stopping points to match your onscreen graphics, then you will need to specify your own segments.
Set pathSegment with pairs of fractional values, indicating the starting and stopping point for each segment, in order. The values are the fraction of the original path length. For example, an evenly split four segment path would look like [0,0.25,0.25,0.5,0.5,0.75,0.75,1].
menuFrontPosition
Specifies which position you consider foremost. Used to set the variable which indicates which menu item is foremost.
menuDebug
Turns on the color segment override for the menu path, making them visible. Useful for properly adjusting your positions manually.
Other Variables to Include in Storyline
frontMenuItem – Value, Indicates which item is currently foremost
javaScriptsLoaded – T/F, Indicates when all the files in the web object are loaded
menuForward – T/F, Set to true to move menu forward, false to go backward
menuResizer – Text, a reference to the resize observer so we can cancel it later
originalPath – Text, a reference to the original path in case we need to reset it
The Rest
For more details, see the comments inside the scripts. The main script goes on the master base slide. The settings script goes on each slide with a menu. The master base slide also contains a script for loading the GSAP MotionPath plugin. It also registers the plugin so you can use it in other scripts. The actual GSAP plugin code is inside the web object, in Scene 2.
The the JavaScript for the MotionPath plugin is available on the GSAP plugin page. It is free, under the publicly available list. I prefer to include the actual code with my projects, so I know exactly what I am using. You never know what version changes might do to your existing projects. The current version is under the WO folder in the zipped project file.
If changes are made to this file, other files are added, or the web object is deleted and replaced, then you will need to update the woFolder variable on the master slide. This variable indicates the name of the folder holding the web object files.
To refresh this variable, publish only Scene 2. Click the Load WO button. A new window or tab will open. Look at the URL address. The name of the web object folder is the portion of the URL BETWEEN “WebObjects/” and “/index.html”. For example, the URL ending with “…/story_content/WebObjects/6Au3D8qJknD/index.html” indicates that the web object folder is called “6Au3D8qJknD”. Copy this value and assign it to woFolder in the master slide trigger.
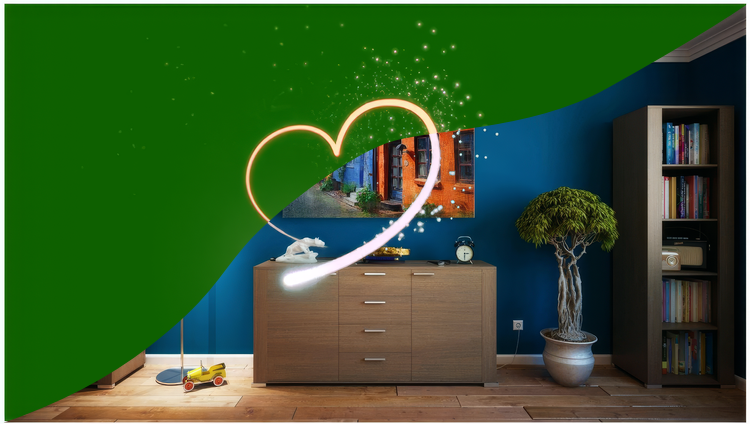
I’m sure you’ve seen the various images and even videos on offer in Storyline’s content library with green-screen backgrounds. You know, the ones often used to key in alternate images into the green areas. There are even more freely available on the web. Maybe you have your own custom green-screen media from other projects. Unfortunately, Storyline does not offer a built-in way to utilize these media, so they’ve been of limited use. You can certainly try masking out the green in images and that often works, but green-screen video in particular has no real options outside of editing in outside applications.
Here, I will describe an actually pretty simple approach that allows you to apply chroma-key and other color effects to these media, right inside your finished project. This removes most of the need for other tools and opens the possibility for more dynamic effects that can be applied to your media on the fly.
This filter allows us to customize how the colors in an SVG are displayed in a web page. One effect is that you can make a color transparent, essentially keying the color out and allowing what’s below to show through. It also allows us to change the colors displayed.
Media in Storyline
Images in storyline are generally placed inside an SVG structure. The image may be raster, but it’s put inside an SVG to allow easier handling and manipulation. It also allows things like borders to be added. Videos are placed inside regular <div> elements, but with a little JavaScript we can move them into an SVG to make handling them similar to regular images. Once it’s in the SVG, we can apply SVG filters.
The Script
There are two project files included with this post. One shows a simple application of this effect to an image or video on a slide. The steps are as follows:
A media file (image or video) is placed on your slide.
A variable called tag is set to match the first unique portion of the media’s alternate text (right click media on timeline, select Accessibility).
A variable called filterValue is set with the correct settings for your desired filter.
A trigger then runs a script that looks in your slide for the media referenced in tag. If it is an image, then the details for the filter (in filterValue) are inserted into the existing SVG wrapping the image. If it is a video, then a new SVG is created, the filter inserted, the video inserted, and then the SVG placed where the video used to be. This all happens when you click the Key It! button.
It is quite easy to add to a slide and apply. You could apply this to multiple media on one slide by changing tag and filterValue before each additional triggering of the script. There is another variable called filterName that holds a reference to the filter you set on the media. If you wanted to change the effect later, you can use this to access and replace the filter values (see the scripts inside the other Tester project for details). Note, if you wanted to dynamically update multiple filtered media on one slide, you would need to modify the scripts slightly to load and save the filter references to a sequential set of SL variables rather than just one.
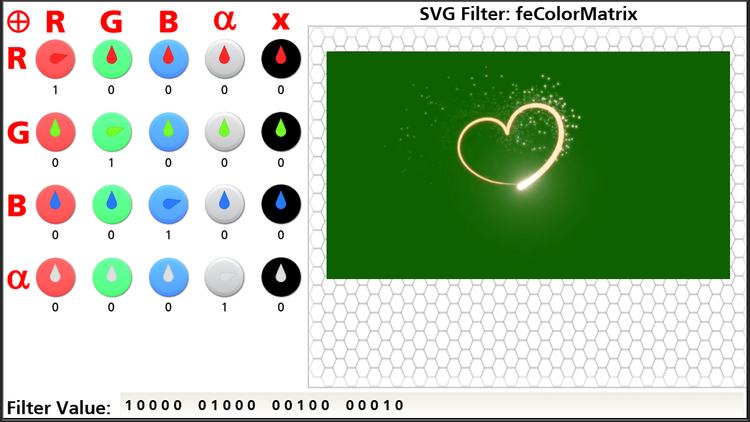
Getting the filterValue Settings
Since our filter is using a matrix of values, the exact settings can be difficult to wrap your head around. I’ve included another project called Tester that lets you insert your desired media onto the slide, set the tag variable, and then publish the project to determine the settings you need. You can stack media so your keyed media will overlay any other media you plan to use. This lets you judge the final effect. Once published, you will see your media, a set of controls on the side, and a final filter value at the bottom.
Use the dials to adjust your matrix values. The RGBα headers represent the rows and columns linked to the red, green, blue, and alpha (transparency) values of the filter. The X column has multipliers which are included since they are part of the filter. The numeric values will show below the dials. The matrix is represented by a text string at the bottom, which you can copy and paste into your SL filterValue variable once you are satisfied.
You can reset the matrix rows or columns by clicking on the corresponding header. Reset the whole matrix by clicking in the upper left corner.
If your desire is to key out background colors, like green or black, you will mostly be adjusting the bottom row of dials. Depending upon the exact color and the other colors in your media, your settings may vary. Trial and error will give you the best results. The upper dials are useful for changing the displayed colors in the media. Try different values and combinations to achieve your goals.
Limitations
This approach is super easy and simple to incorporate into Storyline, but since it is just one filter, it has its limits. You may not be able to get every bit of color completely keyed-out every time. You may lose some detail depending upon how similar your media colors are. If this is unacceptable, you may need external applications.
There are many SVG filters available. You could always add additional filters to improve the output. They can be inserted and applied the same way feColorMatrix is.
I’ve done only limited testing, and I have not investigated using this on SL media that have other effects, cropping, or color filters applied. If the DOM structure changes from what is expected, this this will not work. Best to just use the base media (as it is imported). Resizing is fine, but make sure to test it on any other changes.
Remember to watch the Peek videos linked above for the basics of keying out green and black backgrounds.
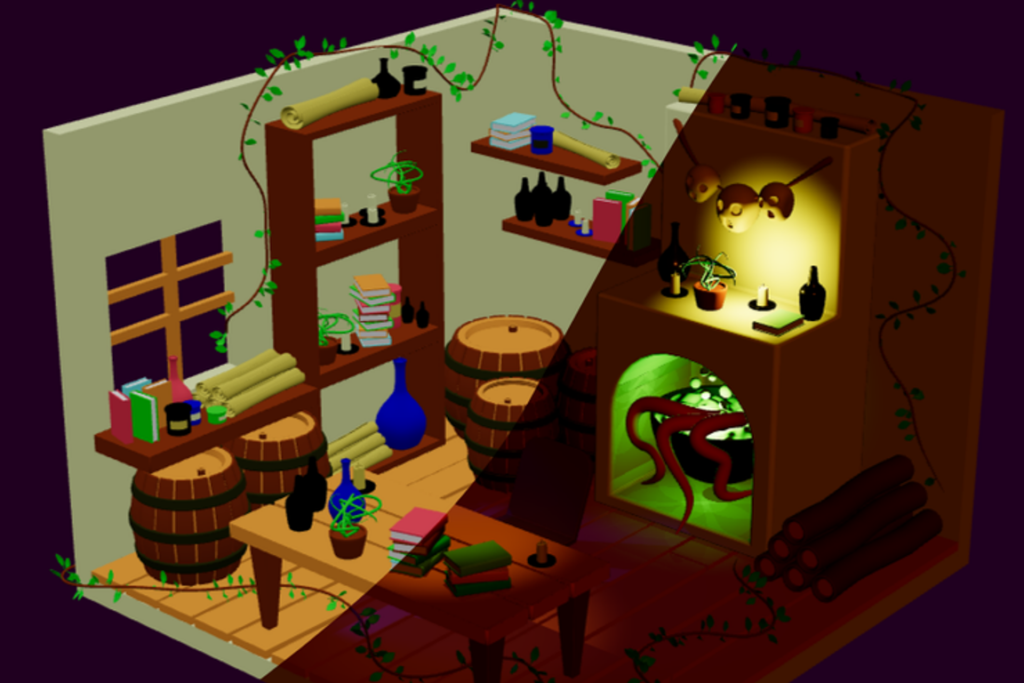
In my ongoing efforts to better my skills, I’ve been learning more about Three.js, a 3D animation and visualization library for the web. At its simplest, Three displays 3D models in a web browser. This is something that many Storyline users have expressed interest in but alas, it is not directly supported. Storyline actually does incorporate Three.js as its viewer for 360-degree images but otherwise does not include it as a part of its projects.
This Project
Since displaying graphics with Three is actually fairly easy, it seems like this is something that would have already been done. Since I couldn’t find much regarding integrating Three with Storyline however, I decided to use this as a test bed for my learning experience. As a disclaimer, I am not a programmer, so my code may be inelegant and inefficient in areas. I also know very little about 3D modeling. My design decisions were based upon what I found interesting or potentially useful and may overlook standard practices or some key features that one might expect. Feel free to comment.
The Model Viewer
I broke this project into two parts. Both are created within Storyline modules. One is a model viewer template that you can use to display two varieties of 3D model files (GLB/GLTF and OBJ models). It accommodates a configuration option (list of variables in a trigger) which allows you to customize many aspects of how the model is displayed on your slide. You can include multiple models, each with their own configuration, and switch between them. The size of the model viewer matches the container object on your slide, so it can be sized to your needs. The template module is pretty simple, with a viewer container, some JavaScript, and a handful of triggers and variables.
The Display Customizer
The second part is another, more complicated Storyline module. This component can be used to customize how your model is visualized. I linked much of the viewer’s functionality to a collection of Storyline controls, spread across multiple slide layers. Once you have your model setup and adjusted to your liking, you can export a block of JavaScript that represents all of the settings used in the viewer’s configuration options. You will copy and paste this into one of your viewer’s project triggers. Combined with your model files, this enables the 3D viewer to reproduce what you designed for display on your slide. Of course, you can also manually edit the configuration options if you desire, but for anything more than minor edits, this is far easier. Due to its complexity (4000+ lines of script and several hundred variables and triggers), I have not shared the project file. I will, however, leave an active link to the published module that you can use to set up your models.
The Details (for anyone who cares)
Inspiration for this project came from the following sources:
A web object containing your model files and some JavaScript
A viewer rectangle on your slide with its accessibility text set to “glb”
A few variables
A few triggers, including a main JavaScript routine and some configuration options
The Web Object
We will use a web object to include your model files and the Three.js base code into your project. While Storyline can load a version of Three when needed, it is older and lacks many of the additional resources we need. The script in the web is a custom bundle of the current Three components we need in this project, along the js-beautify library. The functions and classes are made available as global variables under window. Using a static version ensures that everything works together even if Three issues updates that break interactions.
You also will include copies of your model resources. The configuration script specifies the base model files for the viewer. Additional files are typically referenced from within the base files. It is easiest if you create a folder for each model, and place all of the related files inside that folder, inside the web object folder. The viewer supports GLB, GLTF, and OBJ models.
GLB models are typically one file with everything embedded.
GLTF models often have additional texture files associated with it. Preserve any file structure that came with your model (i.e., If your textures are in their own folder, leave them there. If they are at the same level as the model file, leave them there. Also don’t change any of their names. You can rename the GLTF or GLB files and their containing folder, but they must match what is listed in the configuration script.
OBJ models usually require several files. Include them all unless you know they are not needed. Final renders and reference images are not normally needed. As with GLB and GLTF, OBJ model files can be renamed but must match the configuration script. There is also an MTL file that should use the same name as the OBJ file (this allows the script to find this file). Don’t rename the texture files unless you know they need to be changed.
Note: If you download models from places like CG Trader, Turbo Squid, or Sketchfab then sometimes the textures are separate from the models, or the filenames don’t match what is specified within the GLTF or MTL files. You may have to manually locate and/or rename the texture files. Sometimes you might need to edit the texture specs inside MTL files as well. If you make your own models, then I’ll assume you have what you need.
You can also include optional environmental textures, which can provide lighting information and visual backgrounds within the viewer. These are supported as EXR, HDR, JPEG, PNG, and GIF files. If you include these, create a folder inside your main model folder called myEnvMaps and put the required environmental texture files inside this folder.
Finally, add an empty text file to the web object folder and rename it to index.html.
Once the web object folder is ready, add it to your project in scene 2. Note: Anytime you change the contents of the web object folder, you need to follow ALL of the steps below.
Delete the existing web object
Insert the new web object (browser to the folder, set to open in new window)
Move web object to bottom of timeline list
Publish the single slide in scene 2.
Click the Load Now button to open the web object page
Copy the portion of the URL text matching story_content/WebObjects/[random characters]/
Make sure to include the trailing “/”
Paste this value into the dataFolder variable
The Viewer Rectangle
Create a rectangle. Fill and outline don’t matter, as it will be removed when published. Right-click on the shape’s timeline entry, select accessibility, and edit the text to read glb. You can change this value in the tagViewerContainer variable. This rectangle can be any size or shape and placed wherever on the slide.
Variables and Triggers
Make sure all of the variables listed in the viewer template project are included in your project.
There is one trigger on the slide master. It loads the JavaScript for Three (from the web object). On the base slide, there is one trigger for the main JavaScript viewer routine. For each model you wish to display, there is one additional JavaScript trigger that sets the configuration options. You can generate new text for these triggers using the display customization module.
Display Customizer
The viewer has many options. Most are built into the Three objects used to display the model. A few are specific to this viewer implementation. You can manually edit the configuration trigger for each model if desired, changing values to fine tune your viewer. For large scale changes or initial setup, you might want to use the display customizer module (linked above).
Loading Models
The interface consists of a viewport on the left and various controls on the right. To load a model, you can drag and drop one or more files or a folder onto the viewport (or drop new files later to change models). The viewer will try to find and load the model and all of it associated textures and environment files. Dropping the files is convenient as an interface, but it requires extra processing to access the files. Since some of the model files can be large, it might take several seconds before everything gets loaded. Also keep in mind that all of the processing is done in the browser on your computer. If your machine is not very robust, then processing times may be longer.
If in doubt, open and watch the browser’s inspector panel console to see if there are errors related to loading the files; especially when trying to load new models. Sometimes you don’t have all the files you need or they’re in the wrong folder. You will see what files the viewer is looking for, and if they are found. If unexpected problems occur, try reloading the browser window. Feel free to comment here if you discover recurrent error conditions.
Base Settings
The base settings panel provides the main interface. You can see and control key aspects of lighting, as well as environmental, animation, and shadow conditions. You can also adjust the viewport aspect ratio in case you need something that is not square.
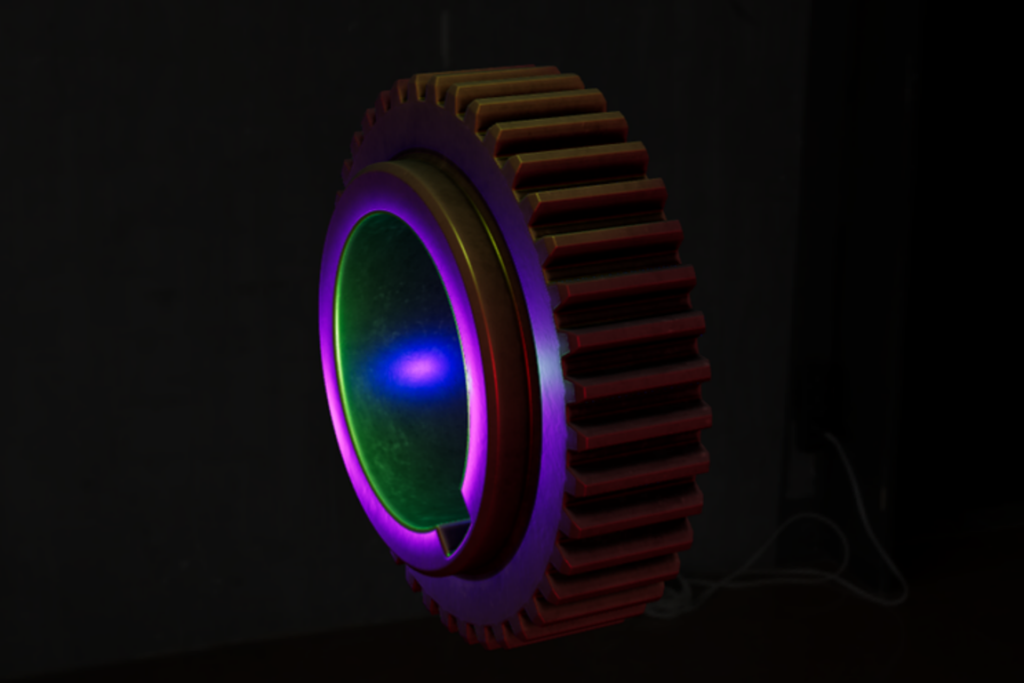
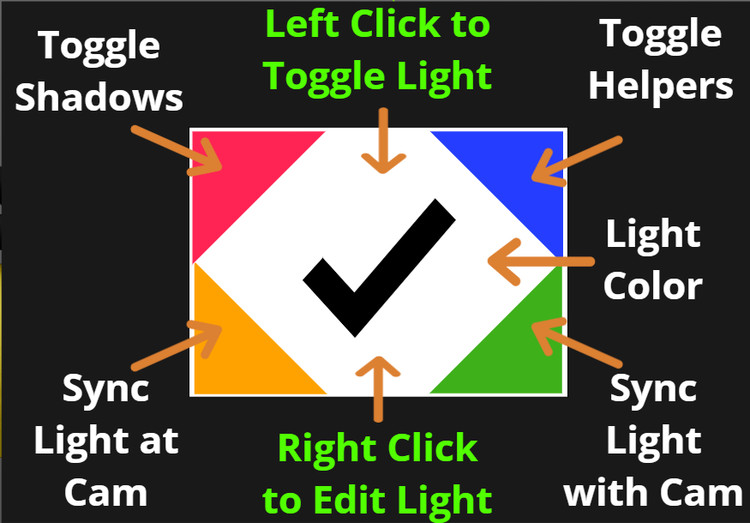
Unless you set up an environment to provide illumination, you will need some lights to see your model. There are four types of lighting available. Ambient is equivalent to overhead sunlight. The other three types offer up to four light sources each. The controls show the colors. The corners control specific features (see the Help button for details). Right click on each square to get additional options.
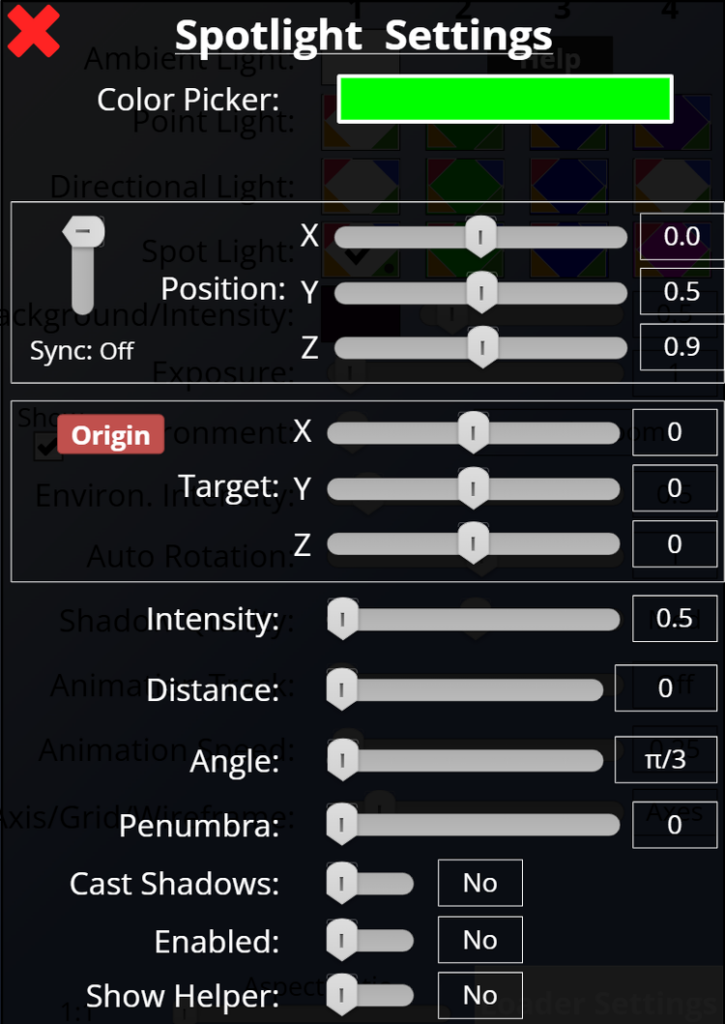
Each light type has its own options. There is a color picker to set your desired color. Making changes will be immediately visible in the viewport. If you can’t see a change, you may need to adjust the intensity or the positioning of the light. There is an option for a helper, which is a visual representation of the light shape and position. Turn this on to help you set up the lights.
Syncing Lights
Since the viewer offers the ability to orbit the camera around your model, lighting usually remains static in relation to your model (i.e., the model and lights appear to rotate together in the viewer). A custom feature in this implementation is the ability to sync your lights to the camera so they also move around your model, creating interesting effects. This can be enabled for each individual light, in two different sync styles. Lights may be made relative to the camera position, so they appear to remain in one place in 3D space. They may also be synced in the direction of the camera, at a fixed distance. This is similar to having a flashlight trained on your model as you view it.
You can also specify whether each light will generate shadows. This can add realism to your displays. Shadows require significant processing, so use them sparingly to prevent laggy performance.
Other Settings
Other settings, including rotation direction and speed, environment controls, intensities, and animations are available. Animations seem to work with GLB/GLTF models. OBJ models do not support animation directly. Try out the various controls on your model to see the effects.
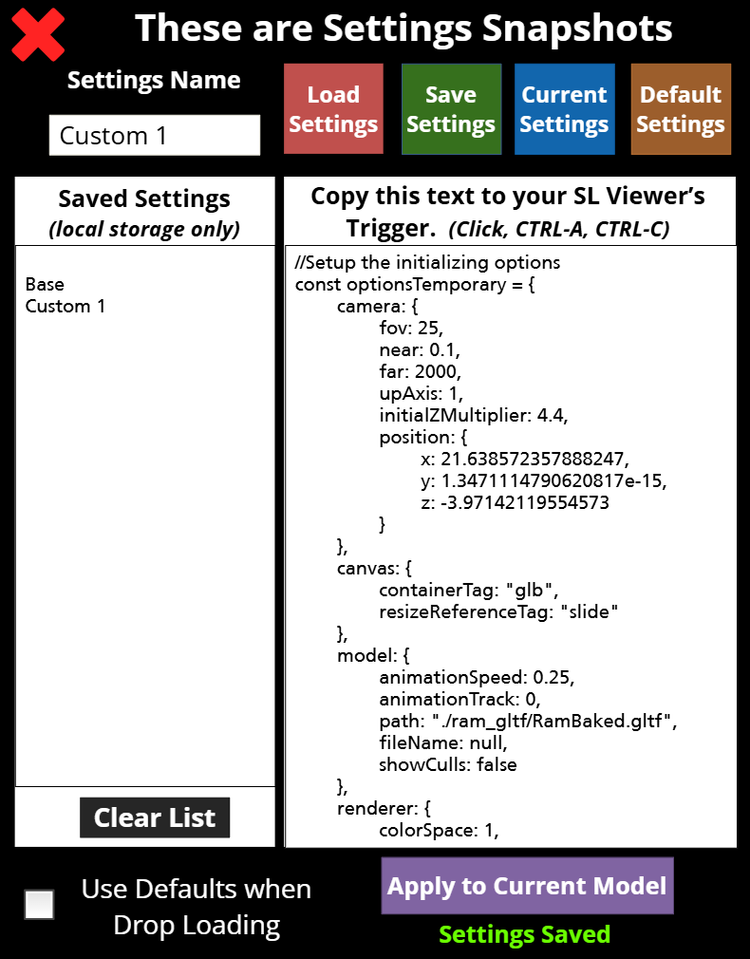
When you have set up your model as desired, you can use the Loader Settings button to export a copy of the current settings snapshot. These include the model filenames and camera positions (like a snapshot). Make sure things are in the position that you want them to start before you click the button.
You will see a long list of settings that can be highlighted and copied. This will get pasted into the options trigger in the Model Viewer module. See the triggers attached to the example buttons in the demo file.
You can also load and save copies of settings as session data in your browser. This could be useful if you have commonly used settings you want to reuse, or if you want to pick up where you left off on the previous day. Note, these are local to your machine and browser. They will not be available elsewhere. You can also Apply the loaded or the default settings to the current model if desired.
The Defaults when Drop Loading checkbox indicates if newly dropped model files will use the current settings or the default start-up settings, in case you prefer one over the other.
Technical Notes (thanks for reading this far)
Loading Files
The Model Viewer uses physical model files included with your published project. This increases your project size but improves the loading speed of the models on the slide. The Display Customizer uses a file drop mechanism to make it easier to switch between random models. This works by parsing through the files or folders dropped and converting them into URL blobs. The blobs act like internal web addresses pointing to each of your files. Large files, especially environment textures or complex models, may take a bit to fully process and load (the Burger model for example). When you utilize the Model viewer for your final product, performance should be better since you only need a single set of files, and they are included locally.
You could potentially modify the Viewer script to allow for loading from external URLs rather than local files, but I have not done that yet.
Environments
Environment textures are 360-degree images, similar to what you use in Storyline. The format can be EXR, HDR, JPEG, PNG, or GIF. This only supports equirectangular, 2:1 images. EXR and HDR files tend to be very large, so keep that in mind. When using an environment Three infers lighting information from the selected image, making external lights unnecessary. If you want to use additional lights, you will need to lower the Environment Intensity setting so the lights don’t get washed out.
The environment does not need to be visible to have an effect. If you want it visualized, then the image will replace the background color. Since the focus is really on your model, it is normal for the environment background to be somewhat blurred. Using low resolution images as textures will make this much more pronounced. If you wanted to have crisp images in the background, I believe you would need to modify the script to project the image onto a sphere instead, as you would when displaying 360-degree images (maybe I’ll add this later).
OBJ Models
My understanding is limited, but environments don’t project properly (or at all) onto imported OBJ models. You can display them, but they provide no lighting effects. Supposedly you can apply the environment textures to the meshes within the model, but I couldn’t get that to work.
My approach, awkward but I like the outcome, is to replace all of the meshes in the loaded OBJ model with new meshes, apply the existing settings, and make some adjustments to shine and gloss settings on the fly. This results in a final model that responds to your environment lighting.
I found that the test models I downloaded all seemed to come out super glossy. I added a few simple steps to calculate relative gloss levels between the model components and applied an overall adjustment to set it to a reasonable level. I was happy with the test results. Your mileage may vary. If your OBJ models don’t come out as you expected, you may need to adjust the MTL file to fine tune the output.
I’ve also found that many OBJ model files (the MTL in particular) contain erroneous paths or incorrect textures assigned to material properties. If your model looks all white, black, grey or some odd color, check the MTL file (it’s plain text) and verify the data. Fix any broken paths, check to see if textures are supposed to be in their own directory, and make sure the correct textures are assigned. Particularly the lines starting with “map_”. These assign the texture images to material properties. Look at the actual texture images, the MTL file, and the Wavefront reference linked below. Play around with different settings to see if you can get it to look like it’s supposed to.
Lastly, the OBJ models don’t support animations like GLB/GLTF models. Even if your source says the model is animated, that may only apply to other model formats. You may be able to convert another animated version to a GLB format online, or by using Blender.
Performance
Remember that JavaScript runs on the user’s machine. Everything that Three and this viewer script does, happens locally. Don’t overburden your model viewer with an abundance of processing requirements if you don’t think the end users’ machine can handle it. Light syncing and shadow display require extra processing. If you use them, do so sparingly to make an impactful point. Not every light needs a shadow to look realistic.
Also, only include the files that are really needed in the final product. Extra environment textures just take up room and slow down website loading times. Excessively high-resolution images do the same and may not be needed. Downloaded models may include extraneous files unrelated to display needs. If you’re not sure they are needed, try removing them and see if everything still works. Only include those that are required.
Customization
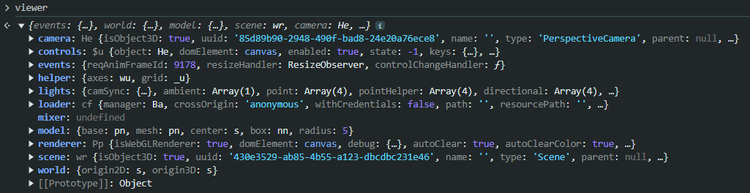
There is a Storyline variable in the project called viewer. This holds a reference to the model viewer. Many of the settings seen in the Display Customizer can be accessed and modified using this variable. If you desire, you could add your own script that loads this viewer object and allows you to directly change settings. Things like turning lights on or off, changing colors, changing positions, starting or stopping rotation or animation, and moving the camera are all easily modifiable, giving you extra control on how your model behaves. You will need to reference the configuration settings script, the main viewer JavaScript trigger, and the Three documentation website (linked above) to understand the possibilities.
Limitations
There are a lot of moving parts in this project (quite literally with the 3D models). The Display Customizer module is quite complicated, and building something like this inside Storyline is not recommended for the faint of heart. It required 4 weeks, on and off, from concept to this beta version. There are undoubtedly logic errors and code conflicts that I have not discovered yet. This project is provided as is, with no guarantees. If you experience an issue, post a comment. I will look into it eventually and fix it if I can. I may post updates if I fix bugs or add any features.
The models included as examples were all available for free from the CG Trader, Turbo Squid, or Sketchfab websites. You can download others or use your own. I could not get FBX models to work properly and lost interest in them. THREE seems to work best with GLB/GLTF models. I like the OBJ models as well since they are easy to manually examine and modify.
Updated (2025-03-21)
Added simple model explosion with adjustable distance
Added simple visibility editing of child meshes
Added support for Draco compression in GLB models
Fixed camera startup positioning from options (e.g., distance and scene panning)
Other minor fixes
Notes
Simple explosion shifts model components outward away from the origin proportional to their radius. Works only if models have component meshes and they have individual position values. Child meshes positioned directly through their geometry will not move as expected, if at all. Many models will not explode in any useful manner.
Visibility editing allows you to isolate and toggle the visibility of child meshes. Useful if the model has many components. Not so much if model is just one or a few meshes with complex geometry or skins. Visibility settings will carry over into the options export so player will show only visible meshes.
GLTF/GLB models can be compressed by the Draco utility to reduce model download sizes. Support for loading these compressed models added (typically an embedded GLB model).
Camera distance and scene panning position data should now export (in options) for proper display by the model player.
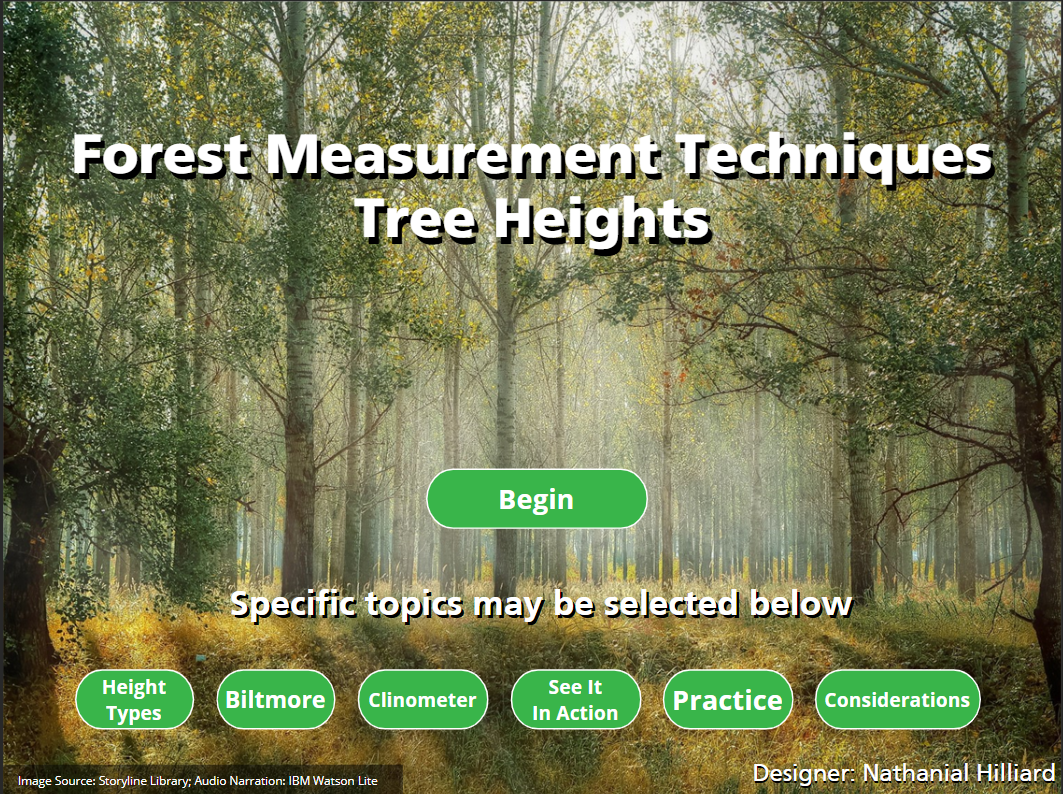
This project created a supplemental, self-directed, asynchronous eLearning module preparing learners to engage in the field measurement of forest tree heights during a university forestry laboratory course.
As part of the teaching team for the Forest Measurements course within Purdue University Forestry, I acquired firsthand experience with some of the shortcomings associated with limited laboratory time and experiential field opportunities. I wanted to offer learners a means to supplement their procedural experiences with a more accessible digital option that could be completed at will and asynchronously outside of the classroom environment.
Project Origins
{Optional summary of how the project came to be and what influenced design decisions or tools}
Design Approach
{Optional summary of the justifications for the basis of the design. May include problems identified, theories used, project specific definitions, and sample integrated content – a few lines to several paragraphs}
Process
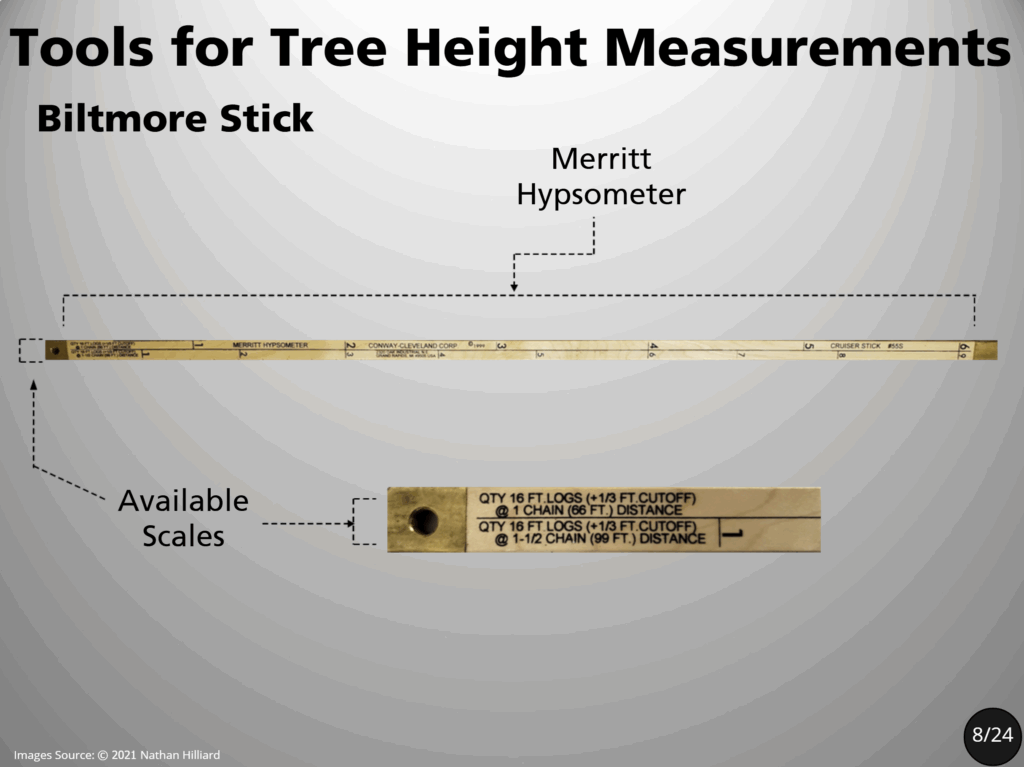
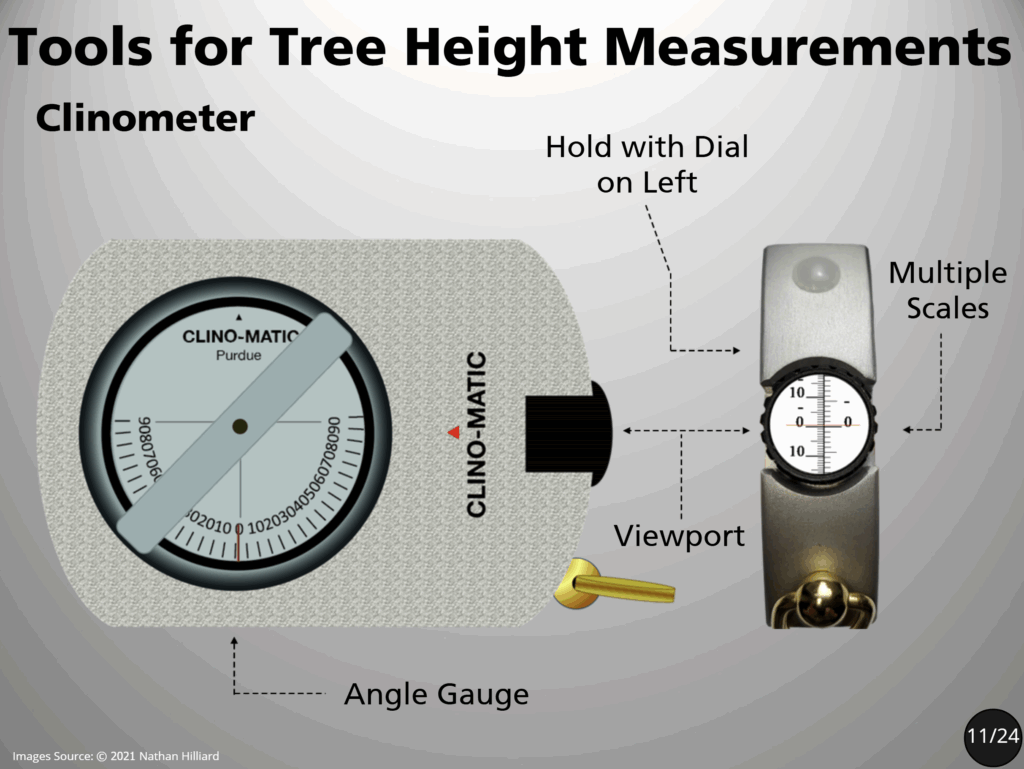
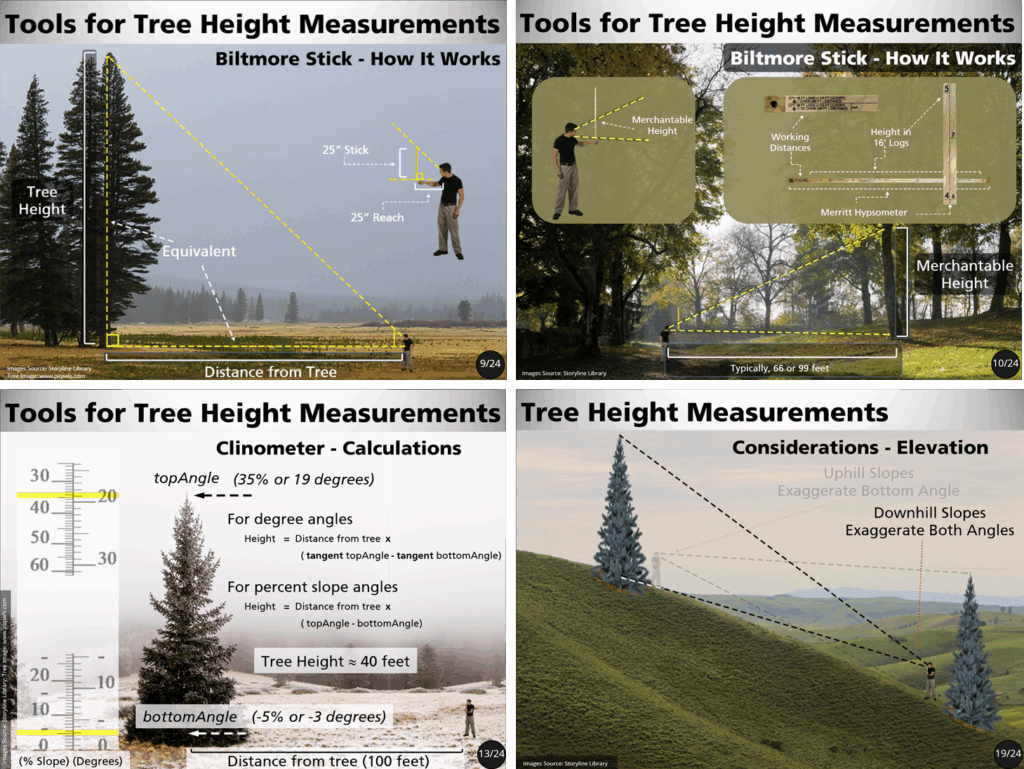
This instruction centered around the proper use of two common height measurement tools. The design process focused on the theroy behind their function, proper technique, interprtation of results, and simulated practice when appropriate.
Since this was small module based on personal knowledge of field techniques, detailed storyboards and prototypes were not developed.
Action Map {or} Instructional Design
{Process to identify key actions leading to goal resolution for client – 2 to 3 lines}
{or}
{Steps of an instructional design process employed to drive design – 5 to 10 lines}
Text-Based Storyboard
{Story design process, describing key focus points of story and resulting storyboard and its contents – 5 to 10 lines}
Prototype
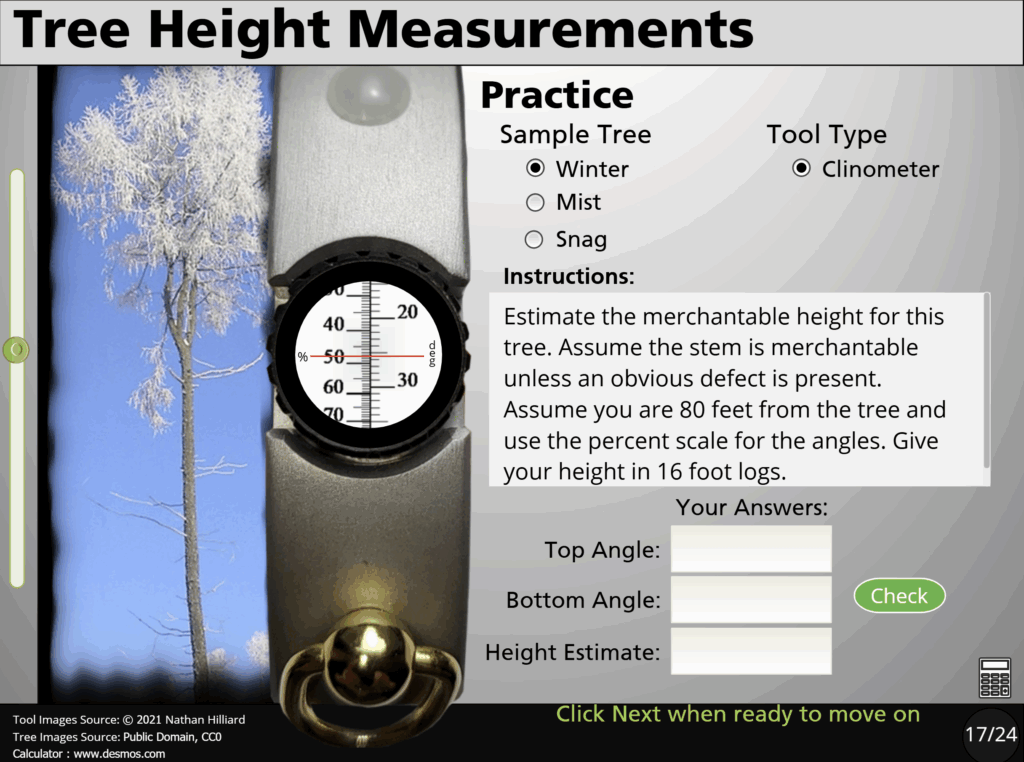
For the more complex measurement tool, the clinometer, a software simulation was developed to allow the learners an opportunity to practice their technique and their interpretation on the results.
Final Product
The final module served as a supplemental tool available for learners interested in additional practice with techniques, and as remediation for learners who found their own technique to need improvement based upon field practice assessment results. The self-driven nature of the module allowed learners to access the knowledge if and when it was appropriate for them.
Client Testimonial
{Optional paragraph summarizing client feedback or comments on final product}
Results and Takeaways
This was one of my earliest Articulate Storyline projects, utilizing basic techniques and a mixture of buit-in and custom media resources. It was also my first venture into including custom JavaScript to expand the available functionality of the product. I found Storyline to be an easy to use and rather robust platform for developing digital learning, and look forward to more advance projects where I can further push its capabilities.
This project worked to enhance undergraduate awareness of intercultural issues relevant to their life and studies in and beyond the university setting.
Responsibilities: Instructional Design, eLearning Development, Content Development
Target Audience: Ccollege Undergraduates
Tools Used: Articulate Storyline
Budget: Low
Client: Purdue’s Center for Intercultural Learning, Mentorship, and Assessment Research
Year: 2018
Overview
The director of the Center for Intercultural Learning, Mentorship, and Assessment Research requested a variety of portable learning modules that could the enhance students’ intercultural development. These needed to be easily integrated into existing academic courses using the campus LMS.
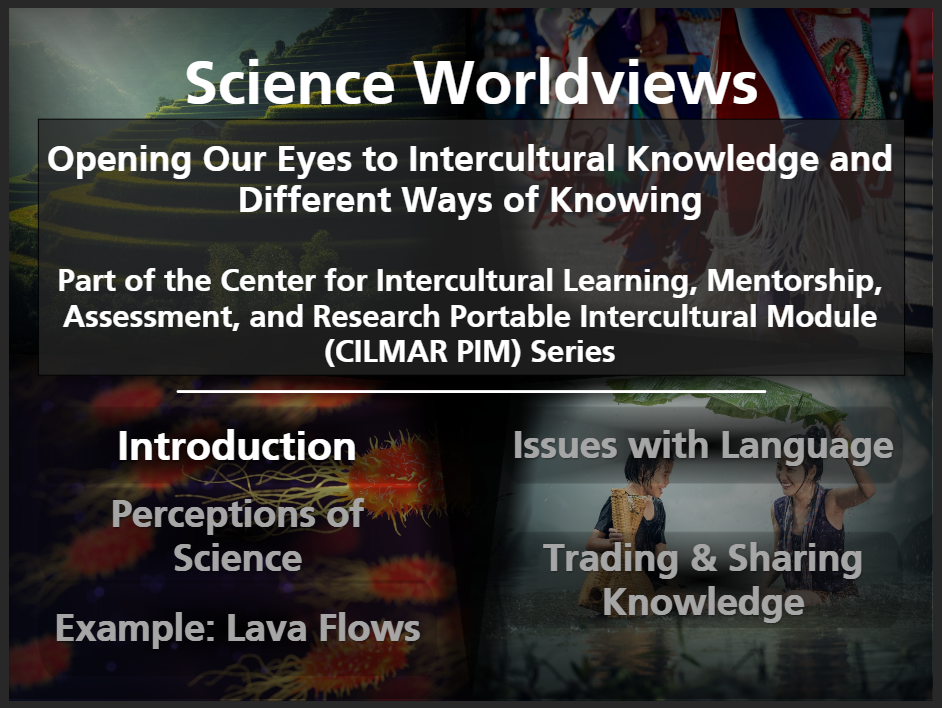
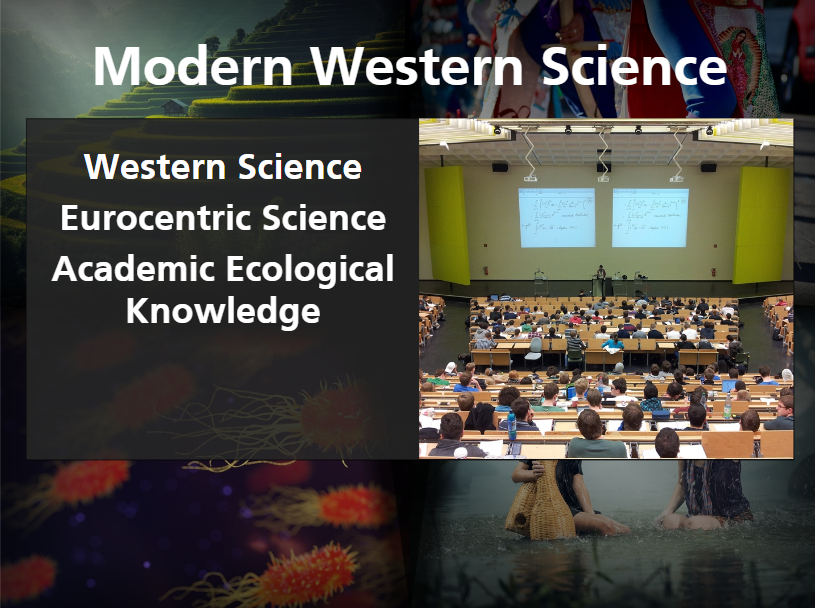
Westernized views of science and nature tend to dominate in academic offerings, risking alienation of others’ cultural views and establishing an overly narrow perspective of science and nature in graduating students. To align with Purdue University’s vision of being “globally recognized and at the forefront of innovation in higher education”, students require an increased awareness of and respect for the more traditional, indigenous, and non-westernized views of science and nature.
As a solution, I proposed a module examining science world views and alternate ways of knowing about science and nature. To improve engagement I suggested a more graphical approach, moving away from the text-heavy format commonly used across undergraduate courses.
The client acknowledged that their other existing portable learning modules were generally text-oriented, and agreed that an alternative approach would likely be well-received. They also appreciated the potential to expand their reach into into science-oriented courses, where they had to establish a foothold.
Project Origins
{Optional summary of how the project came to be and what influenced design decisions or tools}
Design Approach
{Optional summary of the justifications for the basis of the design. May include problems identified, theories used, project specific definitions, and sample integrated content – a few lines to several paragraphs}
Process
This design project consisted of equal parts content development and instructional design. While relying on the intercultural expertise offered by the client, the research of and its application to science-oriented content was left to my discretion as the subject matter expert. To a large extent, research article related to recurrent multicultural issues in science provide the topical framework for this eLearning project.
Instructional Design
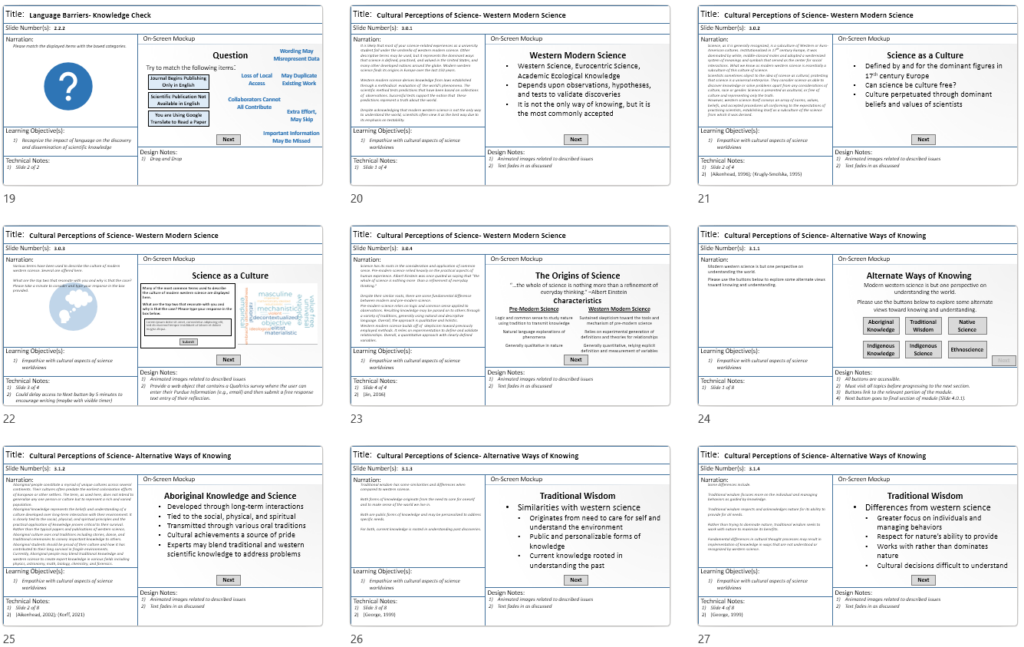
I developed learning objectives after compiling a collection of relevant topics from my literature review. These were extensive, and parsed down into three key areas that encompassed a broad array of differences between western and non-western views of science.
Subtopics were identified that aligned with the Valid Assessment of Learning in Undergraduate Education (VALUE) rubric. Overall, design was informed by use of the ARCS model and Mayer’s multimedia principles.
Text-Based Storyboard
To make it easier for the client to digest the topical areas and how they related to the multicultural issues I identified, I produced a detailed storyboard illustrating the content and flow of the module. It highlighted clear linkages between key subjects and the VALUE rubric; a central tenet to all of the client’s work relating to multicultural development.
Prototype
Once the I received approval on the storyboard and cleared any remaining questions with the client, I prepared a working version of the first sub-module’s content for the client to review for functionality, flow, layout, and artwork.
Final Product
After minor adjustments to the prototype content, the remaining sub-modules followed.
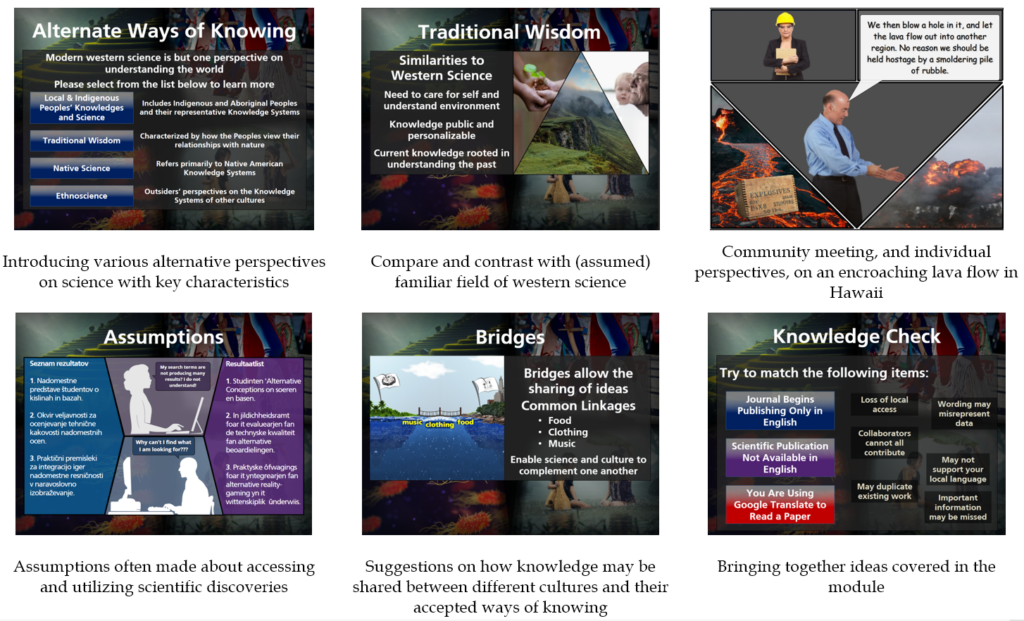
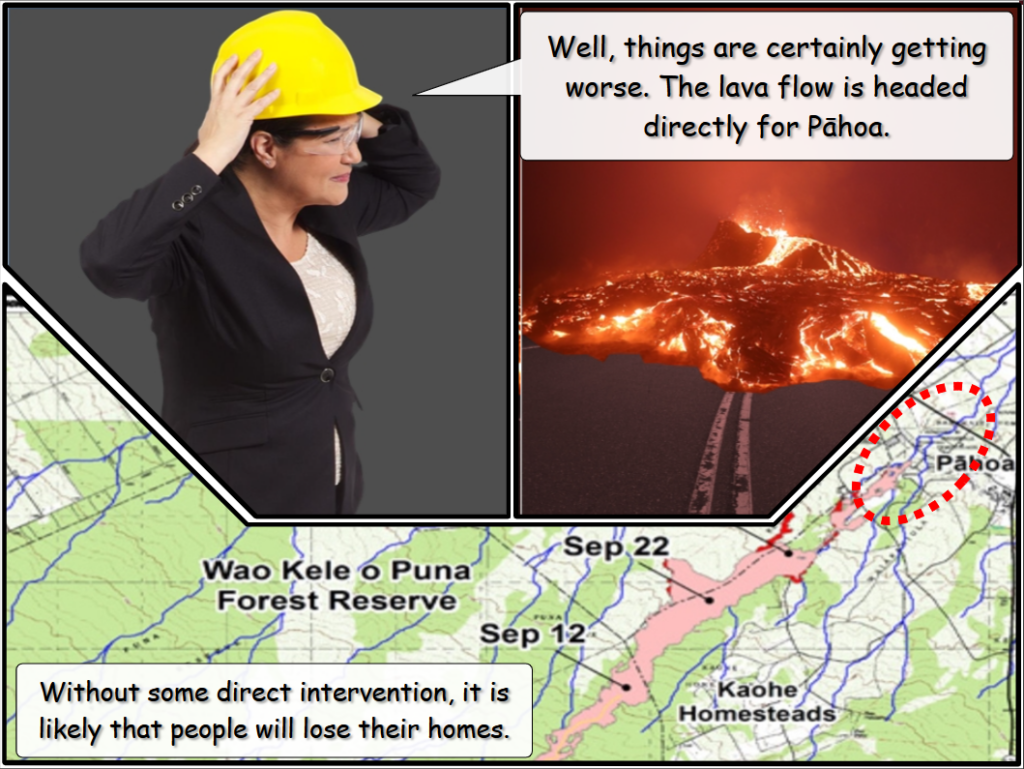
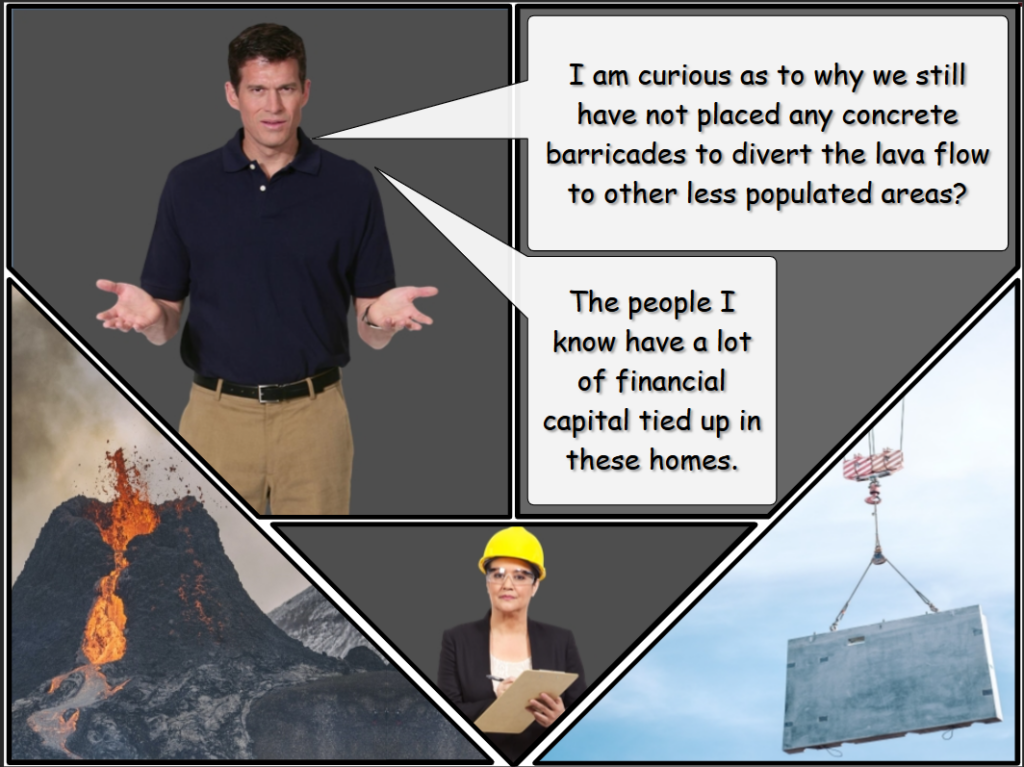
Further discussions ensued regarding the best approach to illustrate community perspectives on important scientific issues. The client suggested some possible scenarios linked to recent world events.
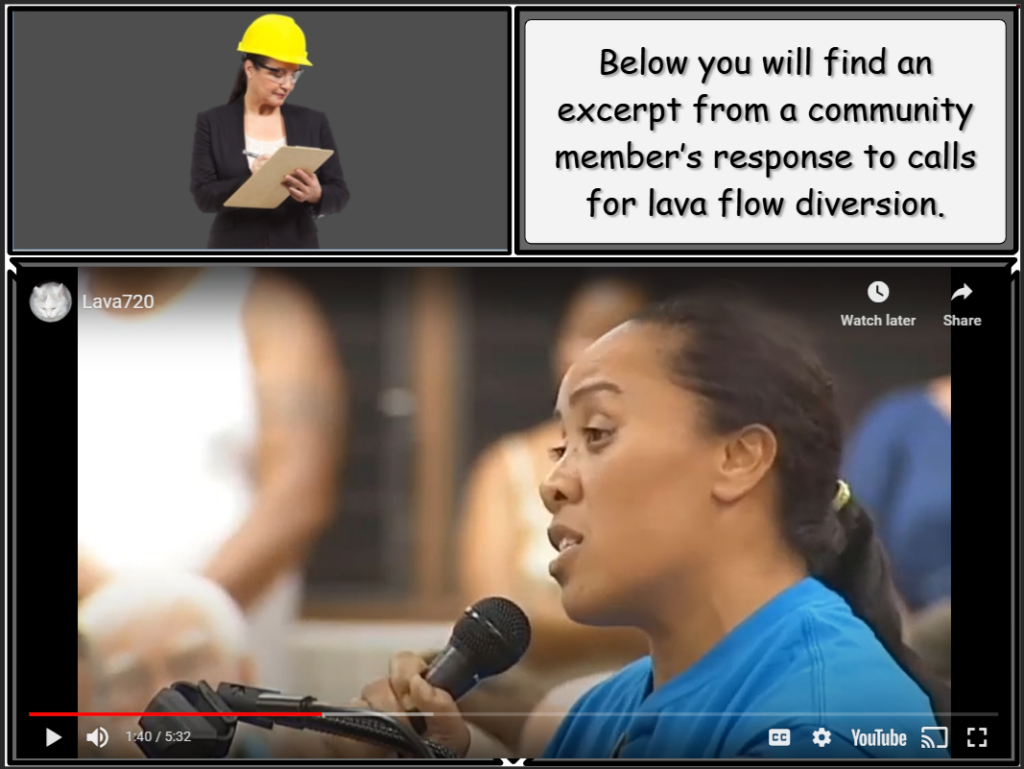
After further investigation, I settled on a community meeting scenario that explored the various and often contrasting concerns and interests of constituents. It served to place these issues into concrete real-world terms, helping students better relate to them.
Client Testimonial
{Optional paragraph summarizing client feedback or comments on final product}
Results and Takeaways
The final product was packaged for LMS distribution and delivered to the client for marketing and dispersal.
As a science graduate, I can attest to the need for increased awareness in this topic area. The decision to move the learning experience away from the typical text-heavy reading format should be beneficial considering the existing cognitive load carried by all learners in the university environment
Despite the increased globalization experienced by newer generations of learners, academics often retain their vestiges of isolationism when presented to large audiences. This project should have far-reaching positive impacts for learners who find themselves accepting careers serving increasingly multicultural audiences.
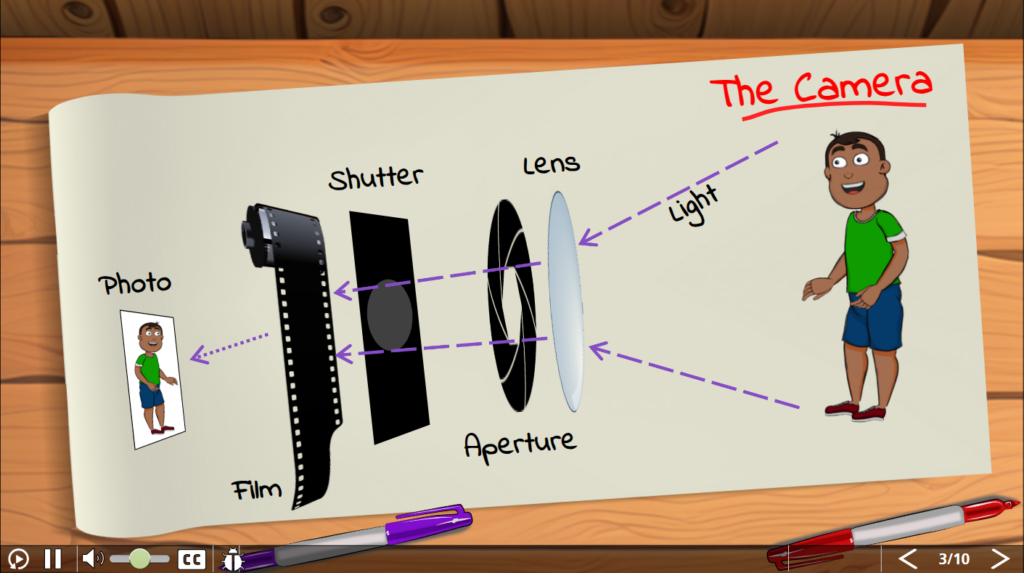
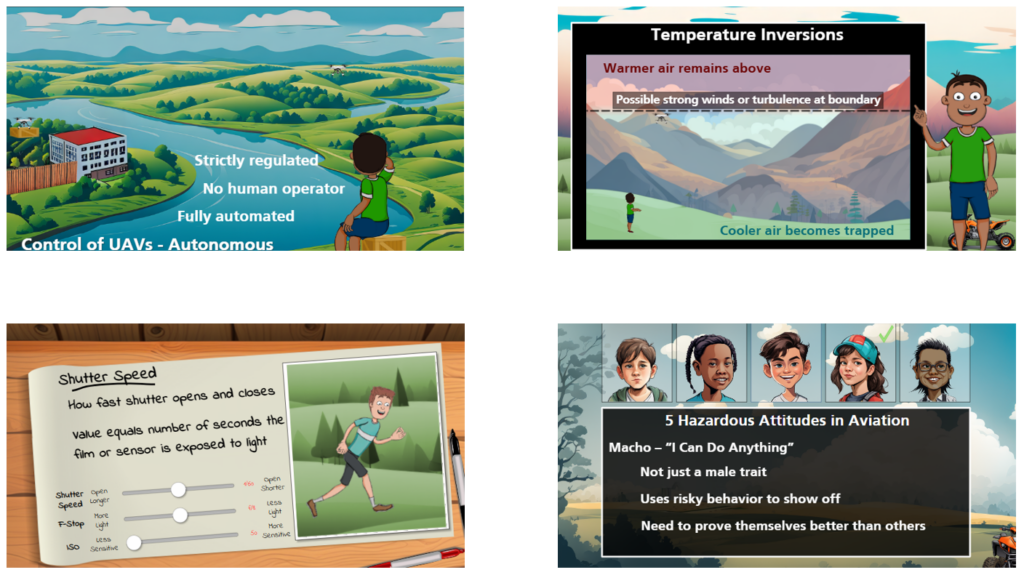
This was a learning module for 4th-grade students in 4-H that introduced the use and safe operation of unmanned aerial vehicles, generally known as drones.
Responsibilities: Instructional Design, eLearning Development, Supplemental Content Development, Multimedia Design and Development using a combination of traditional and generative AI techniques
Target Audience: 4th grade 4-H students
Tools Used: Articulate Storyline, Krita, Reallusion Cartoon Animator, Generative AI
Budget: Low
Client: Purdue University Extension Services
Year: 2024
Overview
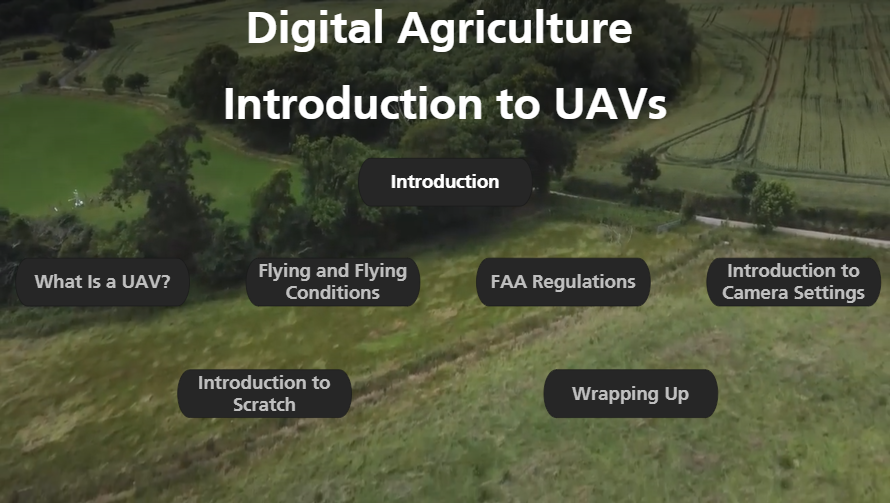
As part of the larger and ongoing Digital Agriculture Project, Purdue Extension educators requested an online asynchronous learning module introducing unmanned aerials vehicles (UAVs) and targeting 4th-grade learners involved in 4-H.
The importance of UAVs in both large and small agricultural operations has substantially increased in recent years. It is vital that upcoming students in agriculture and the sciences become familiar with the operation of and potential uses for UAVs in the broader agricultural landscape. This introductory module was meant to serve as a prequel to a later, more detailed module targeted to high school learners.
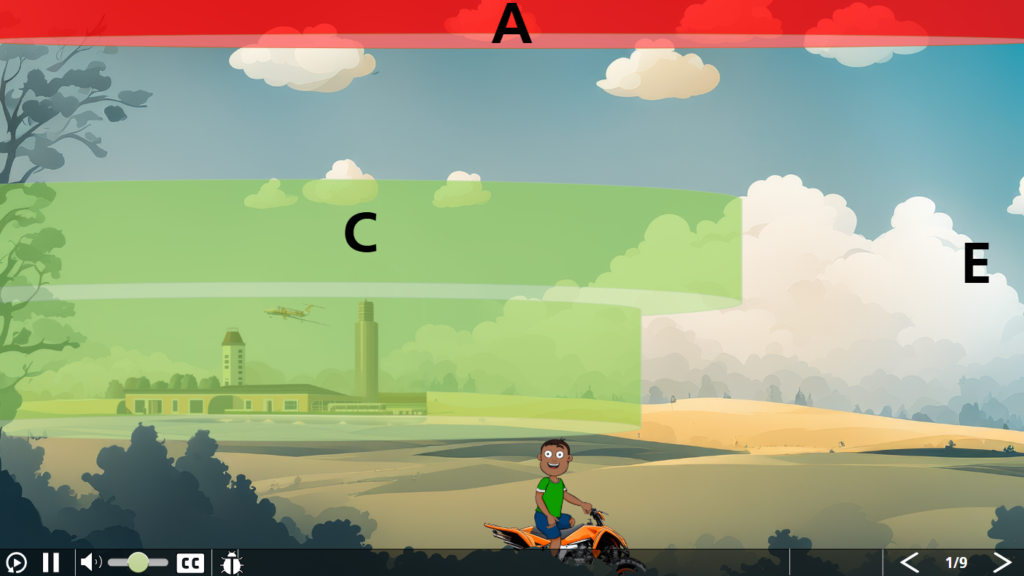
The overall Digital Agriculture project serves an audience spanning a wide range of grade levels. As one of the modules targeting elementary-level learners, this UAV module was designed to present content in a low text, high graphic format. With the goals of topic introduction and interest establishment, this approach lends itself to better engagement with younger learners.
The client agreed with my approach, feeling their learners for this topic would be better served by limiting the cognitive load associated with large amounts of otherwise novel content.
Project Origins
{Optional summary of how the project came to be and what influenced design decisions or tools}
Design Approach
{Optional summary of the justifications for the basis of the design. May include problems identified, theories used, project specific definitions, and sample integrated content – a few lines to several paragraphs}
Process
This project relied heavily on a content base targeting high school and college level learners. A significant task was to extract topics suitable for UAV introduction and translation of the the content into something digestible by 4th-grade students. Another major hurdle was the extensive development of relevant graphical media to support the specialized topic matter. Once these were completed, the development of the final eLearning product was fairly straightforward.
Instructional Design
Working with the client, we identified the primary topics best suited for learner’s needs when getting started with UAVs in 4-H.
Each of these topics were fleshed-out using a combination of advanced UAV learning resources and further content research. Specific attention was given to agricultural applications and impacts of UAV use, centering the learning experience in the agricultural context.
Text-Based Storyboard
I developed a detailed text-based storyboard, expanding on the topical outline, that followed the progression of the learner through various topic areas. This narrative outline established content scenes and described the presentation of individual sub-topics. This also served as the draft for module narration graphic design, and user interactions. I shared with with this this for content approval and feedback. Afterward, this expanded into a graphical storyboard.
Prototype
From the graphic storyboard and the draft narrative, media development began to produce topic-specific graphics, actors, and scenes. I completed initial scene design for select topics.
I also developed of an interactive visual-programming activity, using the SCRATCH block-programming platform, for evaluation prior to full module completion.
The client provided approval on look and feel, as well as interactive scope.
Final Product
Final development of media content, narration scripts, and interactions followed client approval of prototypes. The detailed storyboards facilitated a streamlined development process.
Client Testimonial
{Optional paragraph summarizing client feedback or comments on final product}
Results and Takeaways
The final product is under evaluation with educators and target audience. Awaiting follow-up feedback and adjustment requests.
Since UAV and drone use in agriculture is rapidly expanding, and the topic is well-suited to younger audiences, this module should provide a vital springboard into engaging agriculturally savvy learners ready to engage in advanced science and agriculturally-based disciplines.
I enjoyed creating this story-based module and I believe it will help engage younger learners more effectively than traditional text and video-based modules. A fine line exists between motivational and educational learning design. I strive to encompass both of these into my instructional design work.